This bread machine chocolate chip bread recipe allows you to create a delicious chocolaty sandwich bread… perfect for kids! FYI – We had a lot of leftover chocolate chips after baking some cookies… so I decided to experiment!! Moo ha ha!! Since this bread is made with lots of chocolate chips, I thought it would be semi-disgusting (only good for little candy maniacs). However, it makes a very nice dessert/breakfast bread.
Main Ingredient – Lots of Chocolate!!!

Recipe Sections
| Recipe RatingFeatured Comment Jenny “My kids love chocolate chip cookies. I expect that they will be very pleasantly surprised when they get their lunch sandwiches made with chocolate chip bread. Great recipe.” |
You can even use this chocolate chip bread as a sandwich bread… but be warned that this bread will melt in your mouth AND your hands! My boys loved having their peanut butter sandwiches made with chocolate chip bread slices.
My recipe creates a sandwich-like bread and it uses yeast. It does not create a dessert-like “quick bread” (e.g. banana bread) that uses baking soda and/or baking powder.
Chocolate Chip Bread – Chocolaty Goodness!!

Since this chocolate chip bread recipe is done in a bread machine, it is simple & easy to make. It takes me only about 5 to 10 minutes to prepare and then the bread machine does the rest of the work.
FYI – For details on how to make a 1 lb version of this recipe (for small compact bread machines), please visit my 1 lb Bread Machine Chocolate Chip Bread page.
Ingredients – 1.5 lb Bread Machine Chocolate Chip Bread
- 1 1/8 Cups – Milk (warm) – 267 milliliters
- 3 Tablespoons – Unsalted Butter – 43 grams
- 3 Cups – Bread Flour – 360 grams
- 1/4 Cup – Light Brown Sugar (packed cup) – 54 grams
- 1 1/8 Teaspoons – Salt – 6.8 grams
- 1 1/8 Teaspoons – Bread Machine Yeast (Instant Yeast) – 4.1 grams – Not active dry yeast.
- 1/2 Cup – Semi-Sweet or Dark Chocolate Chips – 85 grams – Do not use mini chocolate chips or milk chocolate chips. See tips section below for more info.
Ingredients – 2 lb Bread Machine Chocolate Chip Bread
- 1 1/2 Cups – Milk (warm) – 345 milliliters
- 4 Tablespoons – Unsalted Butter – 57 grams
- 4 Cups – Bread Flour – 480 grams
- 1/3 Cup – Light Brown Sugar (packed cup) – 72 grams
- 1 1/2 Teaspoons – Salt – 9 grams
- 1 1/2 Teaspoons – Bread Machine Yeast (Instant Yeast) – 4.5 grams – Not active dry yeast.
- 3/4 Cup – Semi-Sweet or Dark Chocolate Chips – 128 grams – Do not use mini chocolate chips or milk chocolate chips. See tips section below for more info.
Servings – Roughly 12 slices
Equipment Needed – Measuring cup & spoons, flexible spatula, oven mitts, cooling rack… and of course, a bread machine!
1 lb Chocolate Chip Bread with Dark Chocolate Chips
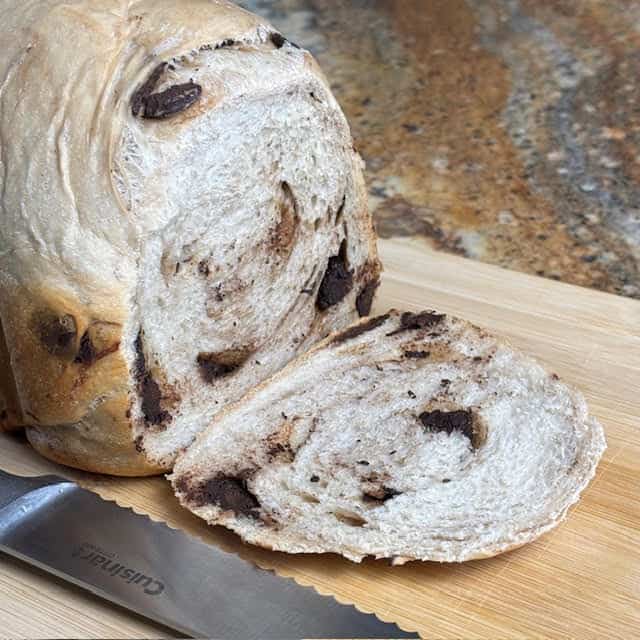
Chocolate Chip Bread Is Perfect for Peanut Butter Sandwiches

Instructions – Bread Machine Chocolate Chip Bread
- Bread machine settings – 1.5 or 2 pound loaf, light color crust and “basic/white” bread setting
- Before making this recipe, place your chocolate chips in the freezer for at least 60 minutes. This helps to prevent the chips from completely melting during the baking process.
- Unplug your bread machine.
- Remove the bread pan from the unplugged bread machine (so when you add the ingredients, they can not accidentally spill into the machine).
- Add all of the ingredients (except the chocolate chips) starting with the milk into the bread machine “bucket” (bread pan). Place the bread machine yeast in last and the yeast should not touch the liquid or salt (until the bread machine is turned on and the ingredients start to be mixed together by the bread machine). Put the bread pan back in the bread machine.
- Plug in the bread machine, enter the appropriate settings (e.g. light color, basic/white bread setting and 1.5 lb or 2 lb) and press the “start” button.
- Add the chocolate chips to the bread pan AFTER the first mixing/kneading cycle is complete and DURING the final mixing/kneading cycle. FYI – For the best results, add the chips when your machine’s “add” beep goes off (or use the automatic ingredient dispenser – if your machine has one). If your machine doesn’t have an “add” beep, you generally can add the chips about 25 minutes after the machine first starts mixing. However, this is less accurate & optimal than using the beep (because kneading times can vary by manufacturer & model). Read your manual to learn YOUR machine’s exact kneading & ingredient addition times. Be aware – If you add the chips too early, they can get chopped up & melt more. And if you add them too late, they won’t get fully incorporated into the dough.
- When the bread machine has finished baking the bread, you should remove the bread and place it on a cooling rack. Use oven mitts when removing the bread machine container (bread loaf pan) as it will be very hot!
- After removing the bread, don’t forget to remove the mixing paddle if it is stuck in the bread. Use oven mitts as the mixing paddle will be very hot coming out of the bread machine. Or wait until the bread is completely cooled and then remove the mixing paddle.
- In my Sunbeam bread machine, the baking takes about 3 hours for a 2 pound bread at the light color & basic bread settings. However, some machines can differ and you don’t want to be away from home when the bread machine “finished” alarm goes off! Your bread machine should show you the length of the baking time after you have entered the settings into the machine. This will allow you to know when to be in the kitchen in order to remove the bread.
- Before using your bread machine, you should read the bread machine manufacturer’s instructions in order to use the bread machine effectively and safely.
- Please read the tips section below for extra information on how to make this recipe successfully & to avoid common bread machine problems.
If you liked this recipe, please leave a comment & 5 star rating. Jump to comments
FYI – Some “Hotter” Bread Machines May Create A Chocolate Bread With No Interior Chips

Tips – Bread Machine Chocolate Bread
- The tips below are designed to help bread machine “novices” and those who haven’t touched their bread machine in years.
- Click on this “print recipe” link if you want to print out this recipe. It includes all of the recipe’s ingredients and instructions. However, the recipe print function does not include my tips section. Please read the tips section in order to avoid common recipe problems.
- This recipe is part of Bread Dad’s series on easy Bread Machine Recipes such as banana bread, French bread, bagels and multigrain bread.
- Warning – Be aware that this recipe does not work the same in all bread machines (as some machines get hotter than others). The recipe in “hotter” machines results in a tasty & chocolaty bread but with very few or no chips being visible in the interior of the bread.
- Please use the “light color” crust setting on your machine. The medium & dark color settings can be too hot and are more likely to melt the chocolate chips. Some machines overbake breads on the medium & dark color settings.
- Recommended – Place your chocolate chips in the freezer for at least 60 minutes before using them to make this recipe. This helps to keep the chips from melting completely when being baked in your bread machine.
- Be aware that some of my visitors like to place their chocolate chips in the freezer overnight before making their bread. They state that this stopped the melting issue with their machines.
- Do not use milk chocolate chips if you want visible chips in your bread. Milk chocolate chips have a lower melting point than semi-sweet chocolate chips and thus are more likely to melt in the baking process. If you use milk chocolate chips, you are likely to get a milk chocolate-flavored bread but without any visible interior chips.
- Do not use mini-chocolate chips if you want visible interior chips. Due to their small size, mini chocolate chips are more likely to melt completely during the baking process.
- Do not use white chocolate chips. They melt super easily.
- Use semi-sweet or dark chocolate chips (sometimes labeled as baking chips) for a greater chance of visible chocolate chips in your bread. These chips are formulated to hold their shape better during baking. For example, they typically have less cocoa butter than milk chocolate so they don’t melt as easily.
- I have also made this chocolate chip bread with M&M®s. You need to freeze them too and the exterior colored candy coating does not survive the kneading & baking process. Try dark chocolate M&M®s to reduce the potential of melting.
- Optional – Replace 1/2 of the chocolate chips with chopped walnuts to make a chocolate chip walnut bread. So even if the chocolate chips melt (and just flavor the bread), you will still get the visible bits of walnuts in your bread (plus a little extra crunch!).
- Optional – Or you can replace 1/2 of the chocolate and replace it with dried cranberries or raisins. I think chocolate and dried cranberries go well together.
- Optional – For dietary reasons, some of the visitors to Bread Dad like to use carob chips instead of chocolate chips. Carob chips have a higher melting point than many types of chocolate chips so they are more likely to survive in your bread. Carob chips are made from carob pods and have a milder & sweeter taste than semi-sweet chocolate chips.
- Visitors – What type of chocolate chip did you use to make this bread? And did you add anything else (such as chopped walnuts or dried cranberries)? Please post your chocolate bread tips & suggestions in the comment section below.
- Visitor variations & suggestions – Amy said “We use Chobani Extra Creamy oat milk instead of regular milk and freeze the semi-sweet chocolate chips overnight. Turns out perfect every time!”, Masaya “added 200gm of choc chips, 50gm of chopped macadamia, 1 tsp hazelnut powder and 1 tsp vanilla essence for that extra indulgence” and Kimberley stated “made this with 2 tsps of cinnamon, froze the chocolate chips (added them when my machine beeped during second knead) and they melted but in a swirl, really nice effect”.
- Important – Add the chocolate chips to the bread pan AFTER the first mixing/kneading cycle is complete and during the final mixing/kneading cycle. Ideally, you want to add the chocolate chips about 5 to 10 minutes before the final mixing/kneading stops in your machine.
- If you add the chips too early, they can get chopped up & melt more. And if you add them too late, the chocolate chips won’t get fully incorporated into the dough.
- For the best results, you should add the chips when your machine’s “add” beep goes off (or use the automatic ingredient dispenser – if your machine has one).
- If you do not have an “add” beep on your bread machine, you can generally add the chips about 25 minutes after the machine starts mixing. This time should work in most bread machines. However, this is less accurate & optimal than using the add beep (because kneading times can vary by manufacturer & model).
- Read your manual to learn YOUR machine’s exact mixing/kneading timelines. Why? Because bread machines vary. Therefore, for the best results, you want to add the chocolate chips based on your machine’s mixing/kneading cycles & times.
- Do NOT add the chips with only 1 to 2 minutes left before the final mixing/kneading ends (or after it has finished). Otherwise, the chips will not be fully mixed into the dough.
- For safety reasons – Don’t put your hands inside the bread machine.
- Do NOT use cold milk. The main problem with using regular milk is that people tend to use cold refrigerated milk and this can slow the yeast growth. Try to use warm milk (or instant powdered milk mixed into warm water). If the milk is just coming out of the refrigerator and thus is too cold, I like to put the milk in my microwave for 15-20 seconds in order to warm it up. However, you should also be aware that the milk/water should not be too hot because very hot milk/water can kill the yeast.
- The ideal temperature for liquid ingredients used when making bread machine bread is around 100 to 110 F. Cold liquids (such as water & milk straight from the refrigerator) will slow yeast growth and liquid ingredients that are 140 F or above can kill the yeast. Some people like to use a digital bread thermometer in order to measure the temperature of their liquid ingredients.
- Optional – Instead of dairy milk, you can use non-dairy milk substitutes such as plain (non-flavored) soy milk, oat milk, etc.
- I like to soften (semi-melt) the butter in my microwave for better “mixability”.
- Before slicing this bread, make sure the bread has COMPLETEDLY cooled or the warm chocolate chips will be soft and smudge a lot. Be aware that even if when completely cooled, there may be some chocolate smudges when you slice the bread.
- Please remember, this recipe creates a sandwich-like bread and uses yeast. It does not create a dessert-like sweet “quick” bread (e.g. banana bread) that uses baking soda and/or baking powder.
- This chocolate chip bread is great if you are making peanut butter sandwiches (even if there are no visible interior chips in the bread). Just spread some peanut butter on the bread slices in order to make a chocolate flavored peanut butter sandwich (it tastes sort of like a giant Reese’s®!!!).
- If you love chocolate, you should also try Bread Dad’s recipes for Moist Chocolate Chip Banana Bread, Chocolate Chunk Banana Bread and No Butter Chocolate Chip Cookies.
- Of course, always keep extra chocolate chips on hand in order to feed any hungry little watchers who might raid your bread-making supplies during the baking process!
- If your bread comes out too dense, it is likely due to one of the following reasons; You are using old or stale yeast, using a cold refrigerator temperature liquid (which slows yeast growth), baking in a cold winter temperature kitchen (yeast likes kitchen temps of 75-80 degree F), using all purpose flour (versus bread flour as called for in the recipe), placing salt on top of or next to the yeast (salt kills yeast so it must be placed away from the yeast in the bread pan), etc. For more reasons, you should visit Bread Dad’s Why Is My Bread Machine Bread So Dense? page.
- Having trouble with bread collapses & misshapen bread tops? Make sure to read my article on Bread Machine Bread Collapses. It has reasons and solutions to potential bread collapses.
- For information on other possible errors, please visit Bread Dad’s page on Common Bread Machine Mistakes.
- If you haven’t used your bread machine in a long time, please buy some NEW bread machine yeast before making your bread. Old yeast can die or lose its potency and this will lead to bread that does not rise properly. Bread machine yeast may not be viable if it has been sitting in your pantry for years.
- If your dough is having trouble rising properly, you should check out my How To Test Yeast page. A yeast test will show you if your yeast is alive & active or dead/expired. It will save you from a few bread disasters!
- Always wear oven mitts/gloves when dealing with a bread machine. The bread pan and the rest of the bread machine can get very hot during the baking process. This means that the bread pan and bread machine is likely to be very hot when you attempt to remove a baked good from the bread machine and/or bread pan.
- For more easy bread ideas, you might to explore Bread Dad’s Bread Machine Recipes or Homemade Bread Recipes sections.
If you liked this recipe, please leave a comment & 5 star rating. Jump to comments
Reference Sources
- Wikipedia, Bread
- Wikipedia, Bread Machine
- Wikipedia, Chocolate
- Wikipedia, M&Ms
Bread Machine – Chocolate Chip Bread
Ingredients
1.5 lb Bread Machine Chocolate Chip Bread
- 1 1/8 Cups Milk (warm) – 267 milliliters
- 3 Tablespoons Unsalted Butter – 43 grams
- 3 Cups Bread Flour – 360 grams
- 1/4 Cup Light Brown Sugar (packed cup) – 54 grams
- 1 1/8 Teaspoons Salt – 6.8 grams
- 1 1/8 Teaspoons Bread Machine Yeast – 4.1 grams
- 1/2 Cup Semi-Sweet Chocolate Chips (or Dark Chocolate Chips) – 85 grams
2 lb Bread Machine Chocolate Chip Bread
- 1 1/2 Cups Milk (warm) – 345 milliliters
- 4 Tablespoons Unsalted Butter – 57 grams
- 4 Cups Bread Flour – 480 grams
- 1/3 Cup Light Brown Sugar – 72 grams
- 1 1/2 Teaspoons Salt – 9 grams
- 1 1/2 Teaspoons Bread Machine Yeast – 4.5 grams
- 3/4 Cup Semi-Sweet Chocolate Chips (or Dark Chocolate Chips) – 128 grams
Instructions
- Bread machine settings – 1.5 lb or 2 pound loaf, light color crust and “basic/white” bread setting
- Before making this recipe, place your chocolate chips in the freezer for at least 60 minutes. This helps to prevent the chips from completely melting during the baking process.
- Unplug your bread machine.
- Remove the bread pan from the unplugged bread machine (so when you add the ingredients, they can not accidentally spill into the machine).
- Add all of the ingredients (except the chocolate chips) starting with the milk into the bread machine “bucket” (bread pan). Place the bread machine yeast in last and the yeast should not touch the liquid or salt (until the bread machine is turned on and the ingredients start to be mixed together by the bread machine). Put the bread pan back in the bread machine.
- Plug in the bread machine, enter the appropriate settings (e.g. light color, basic/white bread setting and 1.5 lb or 2 lb) and press the "start" button.
- Add the chocolate chips to the bread pan AFTER the first mixing/kneading cycle is complete and DURING the final mixing/kneading cycle. FYI – For the best results, add the chips when your machine's "add" beep goes off (or use the automatic ingredient dispenser – if your machine has one). If your machine doesn't have an "add" beep, you generally can add the chips about 25 minutes after the machine first starts mixing. However, this is less accurate & optimal than using the beep (because kneading times can vary by manufacturer & model). Read your manual to learn YOUR machine’s exact kneading & ingredient addition times. Be aware – If you add the chips too early, they can get chopped up & melt more. And if you add them too late, they won't get fully incorporated into the dough.
- When the bread machine has finished baking the bread, you should remove the bread and place it on a cooling rack. Use oven mitts when removing the bread machine container (bread loaf pan) as it will be very hot!
- After removing the bread, don’t forget to remove the mixing paddle if it is stuck in the bread. Use oven mitts as the mixing paddle will be very hot coming out of the bread machine. Or wait until the bread is completely cooled and then remove the mixing paddle.
- In our Sunbeam bread machine, the baking takes about 3 hours for a 2 pound bread at the light color & basic bread settings. However, some machines can differ and you don’t want to be away from home when the bread machine “finished” alarm goes off! Your bread machine should show you the length of the baking time after you have entered the settings into the machine. This will allow you to know when to be in the kitchen in order to remove the bread.
- Before using your bread machine, you should read the bread machine manufacturer’s instructions in order to use the bread machine effectively and safely.
- Please read the recipe's tips section on Bread Dad (BreadDad.com) for extra information on how to make this recipe successfully & to avoid common bread machine problems.
Notes
Nutrition
Related Recipes
- Bread Machine Banana Bread
- Chocolate Chip Banana Bread
- Chocolate Chip Banana Muffins – Great snacks
- No Butter Chocolate Chip Cookies
- No Egg Chocolate Chip Cookies
- Soft Oatmeal Cookies
Please leave a comment & recipe rating in the comment box below. Thanks!