Have turkey leftovers? Turn them into a hot & toasty turkey panini! You just need turkey, fresh mozzarella, cranberry sauce and of course, some homemade bread slices. It is an easy & delicious way to use up turkey leftovers.
Recipe Sections
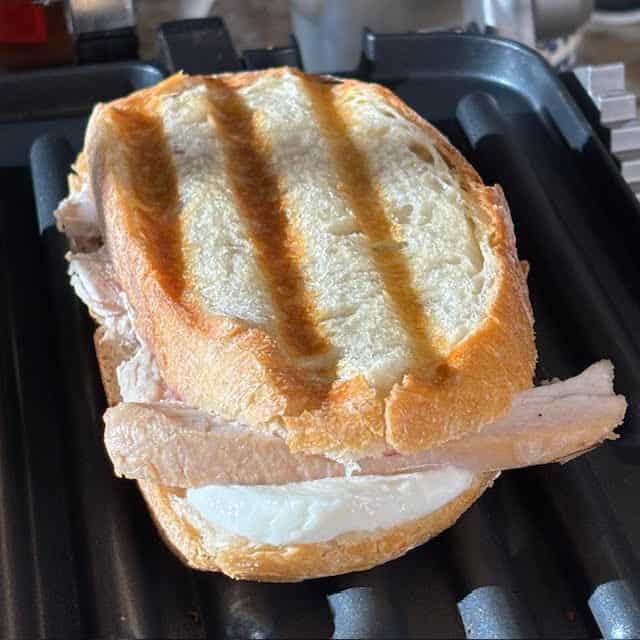
My panini sandwich recipes are based on using a two-sided griddle or panini press/grill (with top & bottom grilling units) and not a frying pan. Because this recipe does not use a frying pan, you don’t have to worry about your sandwich falling apart when being flipped over in the frying pan, etc.
Key Ingredients – Turkey, Fresh Mozzarella & Cranberry Sauce
Ingredients – Turkey Panini
- 2 Slices – Homemade Bread – You can also use store bought bread too!
- 2 Tablespoons – Melted Butter – This will vary based on the size of your bread slices. For example, if you use slices from a 1 lb bread machine bread, you will need less melted butter. If you prefer, you can use olive oil instead of melted butter.
- 1/2 Cup – Roasted Turkey – You can also use thinly sliced grilled chicken, shredded rotisserie chicken, etc. This amount of turkey will vary based on the size of your bread slices.
- 3 Ounces – Fresh Mozzarella (Thinly Sliced) – Again, the amount will vary based on the size of your bread slices.
- 2 Tablespoons – Cranberry Sauce – If you do not have cranberry sauce (or do not like cranberry sauce), you can replace it with apple chutney, fig jam, some leftover stuffing, sauteed onions, etc.
FYI – You can easily double the ingredients above to make 2 paninis, triple the ingredients for 3 paninis, etc.
Servings – 1 Panini
Equipment Needed – Serrated knife, cutting board, pastry brush, oven gloves, heat-resistant spatulas, cooling rack and panini press.
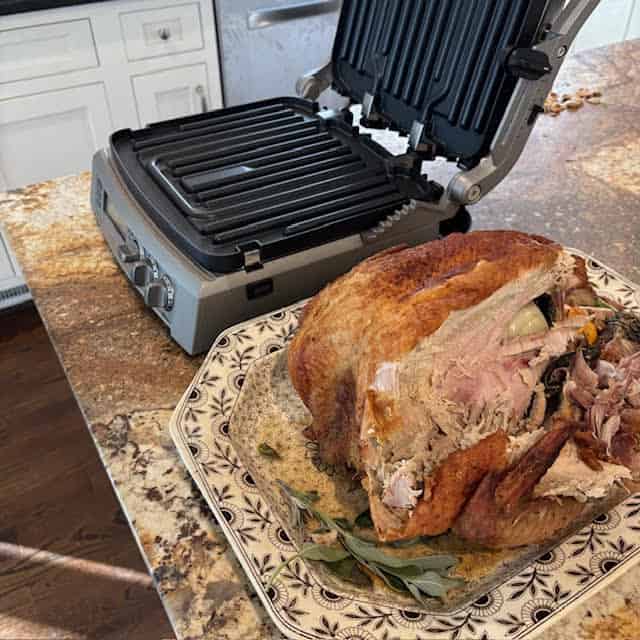
My Panini Press & Thanksgiving Turkey
Instructions
- Preheat your panini press. Set the temperature to 325 F (or to medium heat if you can not set the temperature on your panini press) and turn on the panini grill.
- Prepare the bread for the panini sandwich by melting the butter in your microwave.
- Brush the outer side of each bread slice (the side that will touch the panini press) with a thin layer of melted butter. FYI – I use a pastry brush to “brush” on the melted butter.
- Now assemble the panini sandwich by placing both halves of the bread on a plate or cutting board. FYI – Do not place any ingredients on the panini grill until the sandwich has been fully assembled.
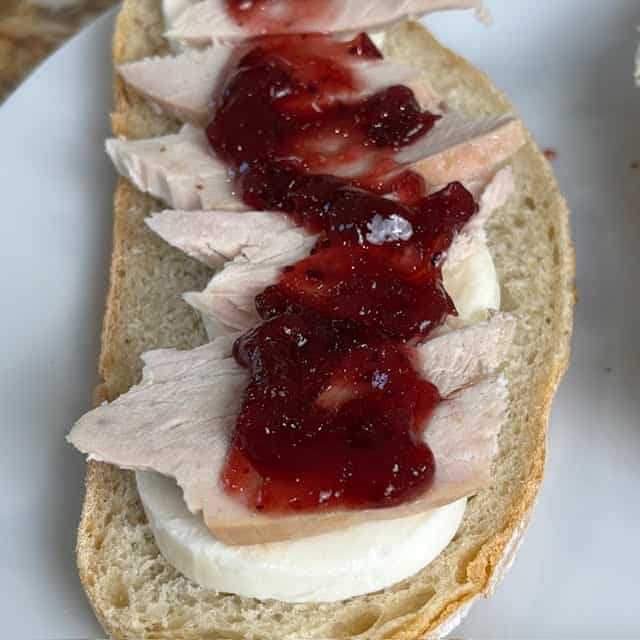
- Place a thin layer of fresh mozzarella on one slice of bread. See the photo above.
- Put shredded roast turkey or thinly sliced roast turkey on top of the mozzarella. See the photo above.
- Spread the cranberry sauce on top of the turkey. See the photo above.
- Finally, place the second slice of bread on top of the cranberry sauce (in order to complete the panini sandwich).
- Use two wide non-scratch spatulas to scoop up the panini and transfer the assembled panini to the heated panini press. Wear oven gloves. FYI – I like to place one large spatula under the bottom of the panini and another large spatula on top in order to hold the panini together when moving the panini to the press/grill.
- Gently lower the top of the panini press/grill until it rests on top of the panini. FYI – Be careful lowering the top of the panini press, you don’t want to accidentally push off the top of your panini.
- Grill for about 3 to 4 minutes. Be aware that the grilling time can vary depending on the panini press, the type of bread and thickness of the bread slices. FYI – I always check at the 3 minute mark to see if the panini needs extra grilling or not.
- When done, turn off the grill. FYI – Be careful as panini grills can stay hot for a long time.
- Use the two spatulas to remove the finished panini from the panini press. Wear oven gloves.
- Since the panini sandwich is very hot, you should place the panini on a wire cooling and let it cool for 1 to 2 minutes. FYI – A wire cooling rack helps to prevent a “soggy” panini bottom (versus allowing the panini to cool on a plate). The cooling rack lets moisture out (versus the moisture being trapped by a plate).
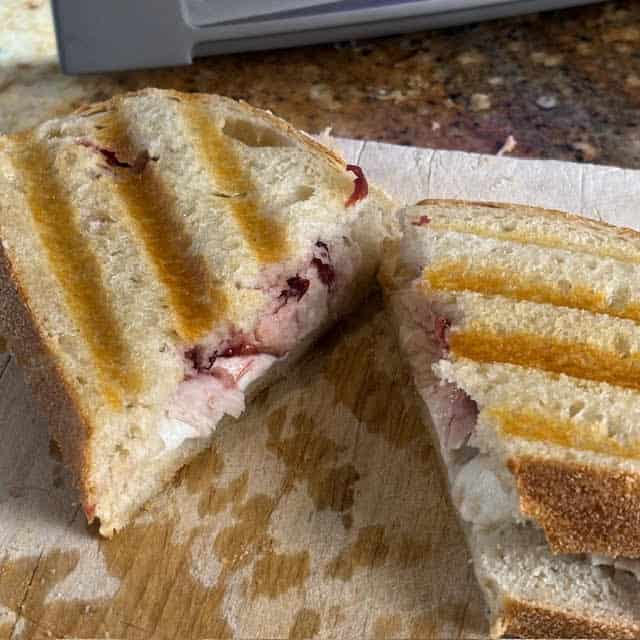
- Serve the panini while it is still warm. Cut the panini in half if desired.
- Please read the tips section below for extra information on how to make this recipe successfully & to avoid common panini problems.
If you liked this recipe, please leave a comment & 5 star rating below. Jump to comment section
📌 Save this recipe – Bookmark or pin it
| ❤️Love bread machine recipes? Then subscribe to my Bread Dad newsletter |
Turkey Panini Sandwich
Helpful Tips
- The tips below are designed to help panini “novices”. Experienced panini makers probably know most of these panini tips already.
- Click on my “print recipe” link if you want to print out this recipe. It includes all of the recipe’s ingredients and instructions. However, the recipe print function does not include this recipe’s tips section. Please read the tips section in order to avoid common recipe problems.
- Always be careful with panini presses & grills. They get very hot and can stay hot for a long time. Wear oven gloves/mitts and use long handled soft spatulas.
- This recipe is one of Bread Dad’s easy Grilled Cheese & Panini Sandwich Recipes such as grilled cheese paninis, ham & cheese paninis and chicken paninis.
- For this turkey panini recipe, I like to use FRESH mozzarella. Why? Because it helps to make a nice & “gooey” panini. Fresh mozzarella is also good at creating those “classic” long stretchy strands of cheese with every bite.
- Make sure to use THINLY sliced mozzarella or the cheese might not melt properly. Many packages of fresh mozzarella come already pre-sliced. These thin pre-cut slices are usually the right thickness for a panini sandwich.
- However, if you don’t have any fresh mozzarella, you can also use your family’s favorite sliced cheese such as cheddar, provolone, American cheese, Monterey Jack, mozzarella, gouda, brie, colby, etc.
- Optional – For an extra “cheesy” turkey panini sandwich, you might like to make this panini with Bread Dad’s Bread Machine Cheese Bread or oven-baked Italian Herb & Cheese Bread.
- Visitors – Did you use fresh mozzarella to make this turkey panini? Or do you like to use another type of cheese? Please leave your cheese ideas & suggestions in the comment section below.
- I like using this recipe when I have a lot of leftover turkey (e.g. after Thanksgiving, Christmas and other holidays). It is a great way to make the roast turkey taste different & fun… so no one complains about having leftovers!!
- Do not overstuff the panini with turkey or it will be difficult to heat the interior of panini sandwich properly.
- The turkey meat must be fully cooked before you add it to the turkey panini sandwich. The panini press will NOT cook the turkey for you inside the sandwich.
- Of course, if you do not have roast turkey available, you use thinly sliced grilled chicken, barbecue chicken, etc.
- Optional – I like to put my turkey shreds or slices in the microwave for about 10 seconds before placing them inside the turkey panini. This warms them up and helps me to avoid biting into refrigerator cold turkey when I am eating a turkey panini sandwich.
- Do not microwave the roast turkey too long or the turkey will come out dry & tough.
- Visitors – Do use mainly leftover holiday turkey to make your turkey panini sandwiches? Or do you roast, deep fry or smoke turkey on a more frequent basis? Please leave your turkey sandwich tips in the comment section below.
- What is cranberry sauce? Cranberry sauce is a sweet & tart tasting condiment usually made from cranberries, sugar, water and sometimes extra spices. As you probably know, cranberry sauce is often served with turkey and/or holiday meals in the United States and Canada.
- FYI – The United States and Canada are the primary growers of cranberries. However, surprisingly (to me), Chile is also a large supplier of cranberries.
- If you want to make a simple cranberry sauce, you need add 3 cups of fresh or frozen cranberries, 1 cup of white granulated sugar and 1 cup of water (or orange juice) to a large saucepan. Then simmer the cranberries on a low heat setting for 10-15 minutes on your stovetop until the cranberries burst and the sauce thickens. Stir the ingredients in the saucepan occasionally so they do not burn.
- I like to make a cranberry turkey panini. However, if you don’t have cranberry sauce, here are some fun cranberry sauce alternatives; apple chutney, pomegranate sauce, fig jam, fried bacon, some leftover stuffing!! and sauteed/caramelized onions.
- Visitors – What do you like to place on top of your turkey & mozzarella? Cranberry sauce? Stuffing? Sauteed onions? Apple chutney? Other? How do you make your turkey paninis taste extra special or different? Please leave your turkey panini variations & suggestions in the comment section below.
- To make this turkey panini, you can use slices of bread machine bread (most of my bread machine sandwich breads work well… except perhaps my extra fluffy recipes) or commercial store bread.
- I think this turkey panini sandwich goes well with my Bread Machine White Bread, Bread Machine Light Rye Bread, Bread Machine Whole Wheat Bread and Bread Machine Sourdough Bread.
- Visitors – What bread do you like to use when making a turkey panini sandwich? White bread? Whole wheat bread (for fiber)? Rye bread (for its different flavor)? Multigrain bread (to add some “crunch”)? Cheese bread (for extra cheesiness)? Other? Please post your bread thoughts in the comment section below.
- The melted butter in this recipe helps to create a crispier panini, adds flavor and helps to “conduct” the heat from the grill into the interior of the panini (which speeds the melting of the cheese).
- Optional – If you don’t have butter, you can use olive oil or your favorite vegetable oil to coat the exterior and interior of the bread.
- I place the melted butter on only the exterior of the sandwich in order to facilitate the grilling of the grilled cheese sandwich. It also adds a nice but mild buttery taste to the panini.
- Optional – Some people like to brush a thin layer of the melted butter of both sides of the bread (exterior and interior sides of the bread slices). This helps the cheese to melt even faster (the extra butter is better conductor of heat), adds a richer & more buttery flavor to the panini. However, this can also make the panini sandwich taste a little greasy!!
- Visitors – Do you use melted butter or olive oil to make your paninis? Please leave your melted butter & olive oil tips in the comment section below.
- Do not add too many extra ingredients when making your paninis. Very thick paninis can have trouble properly heating the inside of the panini without burning the exterior of the panini.
- The amount of internal ingredients (e.g. cheese) depends on the size of the bread slices used. For example, you will need less internal ingredients if you use bread slices from my smaller 1 lb bread machine white bread recipe versus my larger 2 lb bread machine white bread recipe.
- Keep an eye on the bread when grilling your paninis. I like to open the panini machine & check inside every couple of minutes because sandwich bread can grill faster than expected. You don’t want to burn your paninis.
- Do not forget to preheat your panini grill or the grilling will take longer than expected.
- My panini grill “beeps” when it has reached its set temperature target (e.g. 325 F). However, other panini grills do not have this feature so you might need to let your panini grill warm up for at least 5 minutes before using it to bake your panini. Read your manual for the specific time needed to preheat your grill.
- Do not leave your panini unattended and forget about it. You could cause a fire, burn your food, etc.
- I prefer to use a panini press/grill versus a frying pan to make my paninis. Why? There is no flipping of the panini or grilled cheese and in my opinion, you also get the benefit of beautiful grill marks on the bread. Flipping the sandwich during grilling increases the chances that the sandwich will fall apart accidentally. In addition, flipping is more likely to cause hot oil or butter to splatter or spill.
- I use a Cuisinart GR-300WSP1 Elite Griddler to make my panini recipes. I like this Cuisinart machine because it is a wide panini grill with top and bottom heating/grilling elements. FYI – Top & bottom heating “plates” on a panini machine means there is no need to flip a panini over during grilling.
- Make sure the top of the panini press/grill is fully pressed against the top of the bread. The heat from the top grill adds the characteristic grill “marks” to the bread and makes sure the top of the bread is properly heated. With most machines, you do not have to physically press down on the panini. You just let the weight of the top do the “pressing”.
- Try to make sure the top of the panini press/grill is flat and even when you lower it onto the panini. A non-level top is more likely to result in uneven heating and/or pushing the top of the panini off the sandwich. Wear oven gloves if you are handling or adjusting a hot panini press/grill.
- I like to use two large & wide soft spatulas to move my paninis to and from the panini press. I place one spatula under the panini with the other spatula placed on top of the panini. This holds the panini together when moving the panini to & from the press/grill.
- Use soft spatulas in order to avoid scraping or damaging the nonstick surface of the panini press/grill.
- If you need to reheat your paninis, you can reheat them in a frying pan, an oven, a toaster oven or even by using a low heat setting on your panini press.
- However, do NOT use your microwave to reheat your paninis. A microwave is more likely to make your panini soggy.
- In America, panini refers to a hot sandwich that has been grilled/toasted on a panini press/grill, etc. This type of sandwich is usually filled with cheese and various other ingredients such as meat, veggies, etc. A panini also usually has the classic grilled “stripes” on the crust.
- However, the word “panini” comes from Italy. According to Wikipedia, “In Italian, the noun panino (Italian: [pa’niːno]; pl.: panini) is a diminutive of pane (lit. ’bread’) and refers to a bread roll. Panino imbottito (lit. ’stuffed panino’) refers to a sandwich, but the word panino is also often used alone to indicate a sandwich in general.”
- Always wear oven mitts/gloves when dealing with a panini press/grill. The panini press/grill gets very hot during the baking process and it will stay very hot even after you turn off the panini press/grill (it takes a long time to cool).
- Do NOT let kids near your panini grills because panini grills can stay hot for a long time. They might accidentally burn themselves on the panini grill.
- Make sure to READ your panini press/grill instruction manual in order to operate your press/grill safely & correctly. Always follow the safety instructions in your panini press manual.
- In case you want to make your grilled cheese sandwiches & paninis with homemade bread (such as French bread, multigrain bread and rolls), you might want to explore Bread Dad’s sections for Bread Machine Recipes and Homemade Bread Recipes.
If you liked this recipe, please leave a comment & 5 star rating below. Jump to comment section
| 📌Follow Bread Dad on Facebook for recipes & baking tips! |
Want More Recipes? Try These Next
- Bread Machine Recipes – 90+ recipes for banana bread, sourdough bread, pizza dough, cinnamon raisin bread, etc.
- Bread Recipes – French bread, buttermilk bread, bagels, Italian bread, etc.
- Banana Bread Recipes – 60+ recipes for banana nut bread, eggless banana bread, chocolate chip banana bread, etc.
- Quick Bread Recipes – Recipes using baking soda such as pumpkin bread, cranberry bread, etc.
| Made this recipe today? Snap a photo & show it off on my Facebook page! |
Reference Sources
- Wikipedia, Bread Machine
- Wikipedia, Panini Sandwich
- Wikipedia, Turkey As Food

Turkey Panini with Cranberry Sauce & Fresh Mozzarella
Ingredients
- 2 Slices Homemade Bread – You can also use store bought bread too!
- 2 Tablespoons Melted Butter – This will vary based on the size of your bread slices. For example, if you use slices from a 1 lb bread machine bread, you will need less melted butter. If you prefer, you can use olive oil instead of melted butter.
- 1/2 Cup Roasted Turkey – You can also use thinly sliced grilled chicken, shredded rotisserie chicken, etc. This amount will vary based on the size of your bread slices.
- 3 Ounces Fresh Mozzarella (Thinly Sliced) – Again, the amount will vary based on the size of your bread slices.
- 2 Tablespoons Cranberry Sauce
Instructions
- Preheat your panini press. Set the temperature to 325 F (or to medium heat if you can not set the temperature on your panini press) and turn on the panini grill.
- Prepare the bread for the panini sandwich by melting the butter in your microwave.
- Brush the outer side of each bread slice (the side that will touch the panini press) with a thin layer of melted butter. FYI – I use a pastry brush to “brush” on the melted butter.
- Now assemble the panini sandwich by placing both halves of the bread on a plate or cutting board. FYI – Do not place any ingredients on the panini grill until the sandwich has been fully assembled.
- Place a thin layer of fresh mozzarella on one slice of bread.
- Put shredded roast turkey or thinly sliced roast turkey on top of the mozzarella.
- Spread the cranberry sauce on top of the turkey.
- Finally, place the second slice of bread on top of the cranberry sauce (in order to complete the panini sandwich).
- Use two wide non-scratch spatulas to scoop up the panini and transfer the assembled panini to the heated panini press. Wear oven gloves. FYI – I like to place one large spatula under the bottom of the panini and another large spatula on top in order to hold the panini together when moving the panini to the press/grill.
- Gently lower the top of the panini press/grill until it rests on top of the panini. FYI – Be careful lowering the top of the panini press, you don’t want to accidentally push off the top of your panini.
- Grill for about 3 to 4 minutes. Be aware that the grilling time can vary depending on the panini press, the type of bread and thickness of the bread slices. FYI – I always check at the 3 minute mark to see if the panini needs extra grilling or not.
- When done, turn off the grill. FYI – Be careful as panini grills can stay hot for a long time.
- Use the two spatulas to remove the finished panini from the panini press. Wear oven gloves.
- Since the panini sandwich is very hot, you should place the panini on a wire cooling and let it cool for 1 to 2 minutes. FYI – A wire cooling rack helps to prevent a “soggy” panini bottom (versus allowing the panini to cool on a plate). The cooling rack lets moisture out (versus the moisture being trapped by a plate).
- Serve the panini while it is still warm. Cut the panini in half if desired.
- Please read the recipe's tips section on Bread Dad (BreadDad.com) for extra information on how to make this recipe successfully & to avoid common panini problems.
Notes
Related Recipes
- Air Fryer Grilled Cheese
- Chicken Panini
- Grilled Cheese Panini
- Ham & Cheese Panini
- Oven Baked Grilled Cheese
- Bread Machine White Bread
Please leave a comment & recipe rating in the comment box below. Thanks!