This bread machine gluten free banana bread recipe is simple to make and creates a delicious banana bread. You can also easily enhance this banana bread with extra chopped nuts or chocolate chips.
Bread Machine Gluten Free Banana Bread
Recipe Sections
Of course, the key to great gluten free banana breads is… RIPE bananas!!! If you use bananas that are hard & yellow or even worse green, they are unripe and contain too much starch and not enough natural sugars… so your banana bread will taste bland! You need to use soft ripe bananas whose yellow exterior peels are covered in many black & brown spots. These ripe bananas have converted much of the banana starch into natural sugars and more banana flavor. The use of RIPE bananas helps to create a much better tasting banana bread.
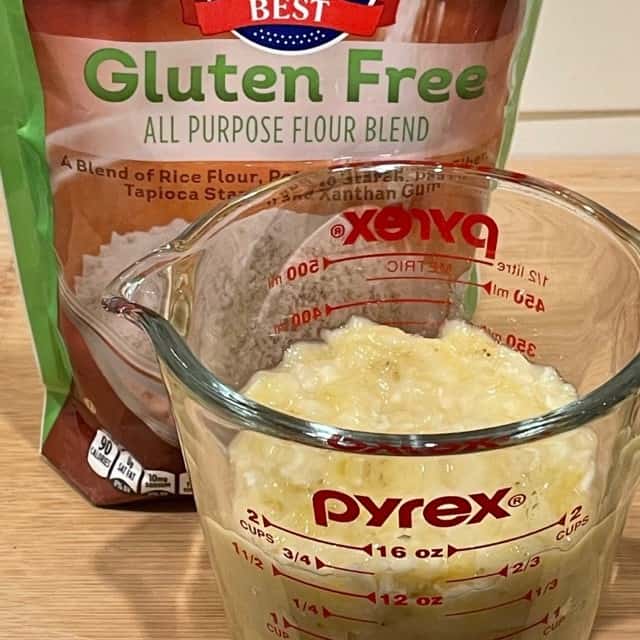
Key Ingredients – Gluten Free All Purpose Flour & Mashed Ripe Bananas
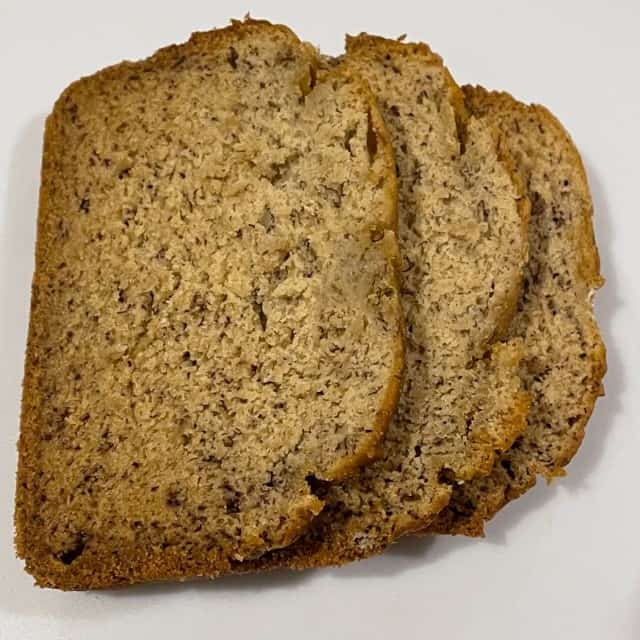
You will like this bread machine gluten free banana bread. It looks like real banana bread… it tastes like real banana bread… it is real banana bread! Beyond gluten free flour, this banana bread recipe uses simple ingredients such as mashed bananas, eggs, butter and sugar. It only takes me about 10-15 minutes to prepare this gluten free banana bread recipe and then the bread machine does the rest of the work.
Ingredients
- 1 1/4 Cups – Bananas (ripe) – 288 grams – Roughly 2 1/2 large bananas
- 8 Tablespoons – Unsalted Butter (softened) – 115 grams
- 2 – Large Eggs
- 2 Cups – Gluten Free All Purpose Flour – 320 grams – This recipe is based on using gluten free all purpose flour (not measure for measure flour) that includes xanthan gum. See the tips section for more information.
- 1 Cup – Light Brown Sugar (packed cup) – 215 grams
- 1 Teaspoon – Vanilla Extract – 5 milliliters
- 1 Teaspoon – Baking Soda – 5 grams
- 1 Teaspoon – Baking Powder – 4 grams
- 1/2 Teaspoon – Salt – 3 grams
- Optional – 1/2 Cup of Chopped Walnuts (58 grams) or 1/2 cup of MINI chocolate chips (67 grams)
Servings – Roughly 12 slices
Equipment Needed – Measuring cup & spoons, soft flexible spatula, oven mitts, wire cooling rack… and of course, a bread machine.
Instructions
- Total Machine Time – approximately 1:40 hours. FYI – The machine will spend roughly 20 minutes mixing and 1:20 hours baking.
- Bread Machine Settings – Cake/Quick Bread, Light Color, 2 lb
- Lightly beat the eggs.
- Mash bananas with a fork.
- Soften the butter in your microwave.
- Unplug your bread machine and then remove the bread pan from the machine.
- Add the mashed bananas, butter and eggs into the bread pan and then add the other ingredients. Try to follow the order of the ingredients listed above so that liquid ingredients are placed in the bread pan first and the dry ingredients second. FYI – Before adding the ingredients to the bread pan, please read the premixing comment below. Also you do not add the optional chopped nuts or chocolate chips at this time. They are added later.
- Optional – Consider premixing the ingredients in a large mixing bowl (versus allowing the bread machine to mix them) and then pouring the mixed batter into the bread pan. This helps to prevent flour from sticking to the sides of the bread pan (and ruining the exterior of the banana bread). FYI – See the tips section for more information on premixing or “scraping” the sides of the bread pan with a soft spatula.
- Put the bread pan back into the bread machine, close the bread machine lid and then plug in the bread machine.
- Enter the bread machine settings (Cake/Quick Bread, Light Color) and press the start button. FYI – Before making this recipe, please READ the tips section below for more information regarding the cake/quick bread setting used to make banana breads. The setting may be called “quick bread”, “cake/quick bread”, “cake”, etc. However, some manufacturers use the “quick bread” setting for rapid sandwich-type breads that use yeast (and not for quick breads such as banana bread that use baking powder/soda). Therefore, this setting can be very confusing… but the tips section below will help you to find the right setting to use on your machine. You need to enter the correct banana bread setting used by your SPECIFIC bread machine model or the banana bread could be under or overcooked.
- Optional – If you want to add chopped walnuts or mini chocolate chips to enhance your gluten free banana bread, please add them after the first bread machine mixing cycle and before the second mixing (final mixing).
- When the bread machine has finished baking the bread, unplug the bread machine, remove the bread pan and place it on a wooden cutting board. Use oven mitts when removing the bread pan because it will be very hot!
- After removing the bread pan from the bread machine, you should let the banana bread stay within the warm bread pan on a wooden cutting board for 10 minutes (as this finishes the baking process) before you remove the banana bread from the bread pan. Wear oven mitts.
- After the 10 minute “cooldown”, you should remove the banana bread from the bread pan and place the banana bread on a wire cooling rack to finish cooling. Use oven mitts when removing the bread.
- You should allow the banana bread to completely cool before cutting. This can take up to 2 hours. Otherwise, the banana bread will break (crumble) more easily when cut.
- Please READ the tips section below for extra information on how to make this recipe successfully and to avoid common bread machine problems with moister “quick bread” recipes such as banana bread.
If you liked this recipe, please leave a comment below & give us a 5 star rating. Jump to comment section
📌 Save this recipe – Bookmark or pin it
| ❤️Love bread machine recipes? Then subscribe to my Bread Dad newsletter |
Tips
- The tips below are designed to help bread machine “novices” and those who haven’t touched their bread machine in years.
- Click on this “print recipe” link if you want to print out this recipe. It includes all of the recipe’s ingredients and instructions. However, the recipe print function does not include our tips section. Please read the tips section in order to avoid common recipe problems.
- This recipe is part of Bread Dad’s series on easy Banana Bread Recipes such as walnut banana bread, Greek yogurt banana bread and blueberry banana bread.
- Or for more gluten free recipes, check out my recipe for Bread Machine Gluten Free Bread. It creates a gluten free sandwich bread.
- Warning – The number 1 error that people make when creating a bread machine banana bread is using the WRONG setting. The people who have a problem often use the “quick” setting designed for fast sandwich bread recipes that use yeast… and NOT the “quick bread” setting designed for moist quick breads (e.g. banana bread & pumpkin bread) that use baking soda/powder. These are two totally different settings. You need to find the correct baking soda/powder “quick bread” setting used with YOUR specific make & model of bread machine. FYI – To avoid this error, please read the setting tips lower down in the tips section.
- To find the setting names used by some of the most popular bread machines, you should visit my Bread Machine Quick Bread Settings page. I set this up to help people find the correct setting for their particular machine.
- Other common errors – Not using fully ripe bananas, not premixing or scraping the sides of the bread pan, not using gluten free all purpose flour, not using a gluten free flour that includes xanthan gum (or an equivalent), etc. See the tips below for more information on these errors.
- Be aware that while this banana bread tastes pretty good, it does not have the prettiest top. The lack of gluten results in more cracks (due to less interior structural support) in the crown of the finished banana bread (versus wheat-based banana bread). However, once you slice it, the GF banana bread looks perfectly normal (and tastes great!).
- SORRY THE TIPS SECTION IS SO LONG & that the recipe instructions are probably overly detailed… BUT… many bread machines differ and I want to help everyone to maximize their banana bread “success” with their specific bread machine model!
- BEFORE making this recipe, please read the tips below especially the section focused on the “cake/quick bread” setting (roughly in the middle of the tips) because bread machines vary & require you to be knowledgeable about your specific bread machine model when making a banana bread. For example, if you do not use the correct setting, you will have trouble with bread machine recipes (e.g. your banana bread may be potentially under or overcooked). The setting name used for banana breads differs on many bread machine models and may be called “Quick”, “Quick Bread”, “Cake”, “Cake/Quick Bread”, etc. Therefore, you need to determine the specific setting on your bread machine model (READ YOUR MANUAL) that was designed for sweet quick bread recipes (e.g. banana bread) that use baking soda/powder and not yeast. I know that this can be confusing… but the “sweet quick bread” tips section below will help you to find the right setting to use on your machine.
- Use RIPE bananas for the best results. If you use unripe green or hard yellow bananas, your banana bread will be bland or lack a lot of banana flavor. Unripe bananas have more starch and less sugar than ripe bananas. The natural sweetness of ripe bananas works best when making banana bread recipes. Ripe bananas are soft and have many small brown & black spots on the exterior of the yellow banana peel.
- For the BEST results, you should measure the mashed bananas in a measuring cup. The use of exactly 1 1/4 cups of mashed bananas will save you from a banana bread that is too dry or too wet. Bananas can differ significantly in size. Therefore, it is easier to get consistent results if you use measuring cups and/or grams of mashed bananas versus just using something like “3 bananas” to make a banana bread.
- Visitors – In the comments section below, please tell me about the extra ingredients (e.g. chocolate chips, dried fruit, chopped walnuts and/or extra spices) that you use to make your gluten free banana bread even better or more unique.
- IMPORTANT – Make sure to use the specific setting on your bread machine designed for CAKE/QUICK BREADS. Read your manual! This setting is for sweet quick bread recipes (e.g. banana bread or pumpkin bread) that use baking soda/powder (and not yeast).
- Be aware that the setting name used for banana bread recipes can VARY by bread machine manufacturer. Here are some examples of the setting names used to make banana bread on various bread machines – the Sunbeam Breadmaker 5891 uses the “Quick” setting, the Hamilton Beach Bread Maker 29881 uses the “Quick” setting, the Black & Decker BOOONJBYXO Bread Maker uses the “Quick Bread” setting, the Breadman 2lb. Professional Bread Maker (BK1050S) uses the “Quick Bread” setting, the Zojirushi BB-PAC20 Bread Maker uses the “Cake” setting and the Cuisinart CBK-100 Bread Maker uses the “Cake/Quick Bread” setting. Therefore, you must check your bread machine’s instructions for the exact setting name used to make banana bread by your specific bread machine model.
- However, be aware that some bread machine models (especially older models & more basic bread makers) have only a limited number of settings and may NOT have a setting that can be used for sweet quick breads (e.g. banana bread). These bread machines are primarily focused on making sandwich-type breads & yeast-based dough (and not baking powder/soda recipes). For example, the Oster Expressbake Breadmaker, 2-lb. Loaf Capacity (model CKSTBRTW20NP) does not have a setting for banana breads (the “sweet” and “quick” settings on this model are used for yeast-based breads). However, other Oster models do have a quick bread/cake setting. In addition, the Breadman TR444 does not have a setting for quick breads but some of the more advanced Breadman bread machines such as the Breadman 2lb. Professional Bread Maker (model BK1050S) do have a quick bread setting. Always read your bread machine manual carefully in order to see if your specific bread machine model can make banana bread-type “quick breads” that use baking powder/soda (and NOT yeast). Check the setting and recipe sections of the manual for definitive examples.
- Don’t be fooled by setting names like Rapid Bread or Express Bread (as these settings are often used for very rapid baking of yeast-based sandwich breads and are not used for sweet quick breads that use baking powder/soda). These express settings will leave your banana bread undercooked. For example, on my Sunbeam, the sweet quick bread setting lasts for roughly 1:40 hours versus the express setting which lasts for only 58 minutes.
- IMPORTANT – Be aware that some bread machine manufacturers even label the rapid/express sandwich bread setting as “Quick Bread”. This can cause a lot of confusion!! because they use the “quick bread” name in order to describe a setting that makes a rapid sandwich-type bread with yeast. This setting is not used to make a sweet quick bread recipe (such as banana bread) that uses baking powder/soda. In general, a setting used for yeast breads can’t be used to make quick bread recipes (such as banana bread) due to different rising & baking lengths.
- Moreover, in many bread machines, the “sweet bread” setting is used for sweet breads that use YEAST (not banana breads that use baking soda/powder). “Sweet bread” recipes are different from sweet quick bread recipes (e.g. banana bread) and utilize different rising & baking times. Therefore, a bread machine banana bread recipe is unlikely to work on the “sweet bread” setting.
- If you are still having trouble finding the quick bread setting, check your bread machine manual for details regarding the “Cake” setting on your machine. Some bread machines have a cake setting that states that they can be used for banana breads & sweet quick breads (and the mixing & baking will last roughly for 1 hour 40-50 minutes). However, other bread machines have a cake setting that is not designed for sweet quick breads. For example, my previous bread machine (Sunbeam) has a cake setting (that lasts for 2 hours 50 minutes) and a “Quick” (used for quick breads such as banana bread) setting (that lasts for roughly 1 hour 40 minutes). Therefore, this banana bread recipe would probably not work well with the cake setting on my previous bread machine.
- FYI – A couple of visitors have mentioned that their Pohl machines can occasionally underbake moist banana breads & quick breads (no yeast). As a solution, these visitors like to premix the batter and then use the “bake” setting (not cake setting) to create a longer baking time (versus relying on the preset cake setting) in order to fully bake their banana bread. Given this issue, please read the Pohl manual carefully on how to make banana breads & quick breads with your specific machine.
- Be aware that older and newer models from the same manufacturer can even use different setting names. Therefore, you need to read the manual included with your specific model in order to determine the correct setting used by your bread machine. Don’t guess with settings or assume that the setting used by a similar model from your bread machine manufacturer is the same as the setting used by your model.
- I know this can be super confusing… but always read your bread machine manual and look for the specific setting designed for banana breads & sweet quick breads (that use baking soda/powder and have lots of sugar & butter/oil in the recipe).
- If you have lost your bread machine manual, you can usually find it by searching online. For example, I can find my manual by typing “Hamilton Beach bread machine manual” into Google.
- This recipe is based on using a gluten free all purpose flour that includes xanthan gum as an ingredient. Xanthan gum is included in many commercial gluten free flours because it helps to provide structure to gluten free baked goods. Without xanthan gum (or an equivalent ingredient), gluten free baked goods tend to be flatter and denser. However, please check with your doctor to see if you have any potential issues with xanthan gum. For more information on xanthan gum, you might like to read this Bob’s Red Mill article “What Does Xanthan Gum Do?“.
- You need to use gluten free ALL PURPOSE FLOUR (and NOT gluten free measure for measure flour). Gluten free measure for measure flour can weigh differently than gluten free all purpose flour (on a cup basis). For example, the King Arthur gluten free measure for measure flour weighs less (per cup) than the King Arthur gluten free all-purpose flour. Therefore, the use of gluten free measure for measure flour can throw off this recipe.
- Gluten free flours can differ significantly as they are often a combination of different flours & starches such as rice flour, tapioca flour, potato starch, etc, You will need to find a commercial flour that works best based on your family’s preferences and health issues.
- FYI – Given the different types & blends of flour used in gluten free flours, the metric measurement of a cup of gluten free flour can differ somewhat between brands. Some brands are “heavier” on a cup basis than others. This can throw off some recipes. For this recipe, I typically use King Arthur Gluten Free All Purpose Flour or Walmart’s Great Value Gluten Free All-Purpose Flour. Their measurements are about the same. In contrast, Bob’s Red Mill gluten free all purpose flour is lighter than the King Arthur & Great Value flours on a cup basis (roughly 136 grams vs 160 grams).
- Visitors – Also please post a comment pointing out the gluten free flour brand that you like to use when making moist “quick breads”? Or post your favorite gluten free baking tips because they are a fantastic help to beginning GF bakers.
- In case, you are wondering why this recipe differs somewhat from my wheat-based banana bread recipes – Gluten free flours weigh differently than wheat-based flours. For example, wheat-based all purpose flour often weighs roughly 120 grams per cup (versus the King Arthur Gluten Free All Purpose Flour at 160 grams per cup).
- Make sure to read the packaging & labels on all of your ingredients to ensure that the ingredients were made in a gluten free environment. You want to avoid the issue of factory cross-contamination with products containing gluten.
- In regards to gluten-related medical or health issues, please see your doctor. Bread Dad does not provide any health or medical advice.
- Consider the issue of potential cross contamination within your household. If you make gluten free recipes and wheat-based recipes (that contain gluten) in your house, you might want to have two sets of baking tools & bread machines (versus using the same tools & machine to make both gluten free and wheat-based baked goods). The use of one set for gluten free baked goods and another set for wheat-based baked goods may help to reduce the chance of cross contamination by gluten particles.
- Use FRESH ingredients (e.g. baking soda and flour) for the best results. For example, if you use stale baking soda and/or baking powder, your banana bread will not rise properly and will be too dense. Baking soda & powder is best if used within 6 months of opening the container.
- Old flour can affect the taste of banana bread. Old flour can spoil and taste bitter, sour, musty, etc. Banana bread made with old flour does not taste great!
- Try to keep your ingredients (e.g. flour) in airtight food containers in order to extend their shelf life and avoid spoilage (e.g. exposure to moisture, pests and dust).
- Old flour (when not stored in an airtight container) can absorb a lot of moisture from the air. This extra moisture throws off recipes and can lead to banana bread collapses, etc.
- Light brown sugar gives this banana bread a slightly richer & deeper flavor. However, do not use DARK brown sugar (unless you really like dark brown sugar) because this type of sugar may overpower the banana flavor. Given its slight acidity, brown sugar also helps to activate the baking soda. If the baking soda is not activated properly, you might get small clumps of bitter baking soda in your banana bread.
- This bread machine recipe differs a little bit from my oven-baked recipes for Almond Flour Banana Nut Bread and Gluten Free Blueberry Banana Bread. Why? Because ovens provide a little more flexibility in terms of adjusting temperatures and baking time lengths (versus bread machines).
- Optional – You can turn this recipe into a gluten free banana nut bread by adding 1/2 cup of chopped walnuts. These should be added after the first mixing cycle is done and before the second mixing (final) cycle is finished. On my Hamilton Beach machine, the “pause” between the first and second mixing cycles occurs about 7 minutes after you have pressed the “start” button.
- Of course, always check your family and guests for potential tree nut and peanut allergies. Do not serve banana bread with chopped walnuts if anyone has a tree nut or peanut allergy.
- FYI – Some bread machines come with an automatic fruit & nut dispenser and this unit adds the fruit/nuts at the right time for those specific machines. Other bread machines will beep when it is time to add chocolate chips, fruit or nuts. Check your bread machine manual for further details.
- Optional – You can also turn this recipe into bread machine gluten free chocolate chip banana bread. To make chocolate chip banana bread, you should add 1/2 of a cup of MINI semi-sweet chocolate chips after the first mixing is finished and before the second/final mixing has started. I don’t like to use heavier regular chocolate chips because they tend to sink to the bottom of the batter. The smaller & lighter “mini” chips seem to spread out better in a banana bread.
- Other Recipe Variation Ideas – Adding chopped pecans, ground cinnamon, dried fruit (e.g. dried cranberries or raisins), fresh fruit (e.g. blueberries or cranberries), etc.
- Nevertheless, ALWAYS follow the manufacturer’s instructions for your specific bread machine on how and when to safely add ingredients such as nuts or chocolate chips once a bread machine is turned on.
- Flour sticking to the sides of your bread machine banana bread? Unfortunately, bread machines have a harder time mixing moister sweet quick bread recipes (versus drier sandwich bread dough). Therefore, after the first mixing cycle has fully stopped (and before the second & final mixing cycle has begun), I like to scrape the sides of the bread pan with a flexible silicon spatula (not a metal spatula). This loosens any flour that may be sticking to the sides of the bread pan (because a bread machine mixing “paddle” doesn’t quite reach the sides of the bread pan). For safety purposes, I do not scrape the sides of the bread pan when the mixing blade is moving. In addition, people should not stick their hands inside bread machines. Moreover, people should always wear oven mitts when dealing with a bread machine because the bread pan & bread machine interior can get quite hot.
- You should ALWAYS follow the instructions included in the manufacturer’s manual for your specific bread machine in order to safely scrape the inside of your bread pan.
- Some people get around this issue by PREMIXING their ingredients. They will first mix all of the ingredients by hand in a mixing bowl and then add it to the bread machine bread pan (versus adding all of the ingredients to the bread pan and letting the bread machine mix everything). While this is an extra step, premixing the ingredients is the best way (better than scraping the bread pan) to reduce the potential for any unwanted small flour “clumps” and/or flour sticking to the sides of the finished banana bread. After hand mixing the ingredients, you should just follow the rest of the recipe instructions (e.g. enter proper bread machine settings and so on). However, always remember to add the ingredients (or hand mixed batter) to the bread pan when the bread pan is out of the bread machine and the bread machine is unplugged.
- Another benefit of premixing. When the bread pan is out of the unplugged machine, some people like to remove the mixing paddle before pouring the batter into the bread pan. They do this because there is no need for the machine to mix the batter (since they have already mixed the batter) and this minimizes the mixing paddle “hole” in the bottom of the banana bread. You will still have the initial 20 or so minutes of “mixing” by the machine but without the paddle, the machine is not really doing anything until the baking cycle commences.
- FYI – If you look at the unsliced banana bread picture higher up on this page, you will see a little flour sticking to the side of the banana bread. Even with my diligent “scraping” of the bread pan with a soft spatula (and my knowledge of this potential problem), I will often miss a spot and have some flour stuck to the edges or bottom of the banana bread. Therefore if you want to avoid this issue, you should premix the ingredients in a separate mixing bowl before adding the batter to the bread pan (which has been removed from the unplugged machine).
- If the top center of the bread looks too moist when you take it out of the bread machine (or you want to make sure the banana bread is completely cooked), you can try the classic baking “toothpick test”. Gently push a long wooden skewer (or long wooden chopstick) into the center of the bread and see if any batter sticks to the skewer. Make sure to wear oven gloves because the bread pan and bread machine will still be hot. If batter is sticking to the skewer then it hasn’t completely cooked. Place the bread loaf pan back into the still warm bread machine for another 5-10 minutes. After the 5-10 minutes, remove the bread pan and retest the banana bread again with the skewer. FYI – Given variability in banana sizes, banana breads tend to have more moistness variability than many other bread machine recipes (and this can lead to excess moisture and the banana bread being potentially undercooked). Moreover, since most bread machines turn off automatically after a specified time and you can not adjust the baking temperature, they are little less flexible than ovens in dealing with baking “variances”.
- Since a toothpick can be too short, I like to use a long chopstick or wooden skewer when conducting the classic “toothpick” test. Remember always wear oven mitts when dealing with a hot bread pan and bread machine.
- If you are consistently getting slightly under baked banana breads, you should try the medium color setting (versus using the light color setting). Some bread machines run a little hotter than others and some run a little cooler.
- After removing the bread pan from the bread machine (and the banana bread successfully passing the optional skewer test), you need to leave the banana bread in the bread loaf container for 10 minutes after you take it out of the bread machine. Denser & moister quick breads take a little longer for the interior dough to be fully baked.
- Be careful when removing the banana bread from the bread loaf pan. Banana breads are much softer than sandwich-type bread loaves. Therefore, they can break or “dent” more easily when you remove them from the bread loaf pan. When removing the banana bread from the bread pan, you should also be careful of the movable bread pan handle (because it can swing into the banana bread and cause damage).
- Long-term storage – If you want to keep your banana bread for more than 1-2 days (depending on your home’s temperature & humidity), you will need to freeze it. Please read Bread Dad’s How To Freeze Banana Bread for more details.
- If you want to try some oven-baked gluten free banana bread recipes, you should check out Bread Dad’s Gluten Free Chocolate Chip Banana Bread and Gluten Free Blueberry Banana Bread recipes.
- If you have a problem with a banana bread recipe, please make sure that you are following the recipe exactly. You will need to make sure that you are inputting the correct bread machine settings, using the exact ingredient measurements (e.g. don’t eyeball the measurements versus using a measuring cup), using the exact ingredients called for in the recipe (e.g. baking soda/powder versus yeast or all purpose flour versus bread flour), etc. Please don’t “wing” things with recipes unless you are willing to live with your experiments!
- Please read the instructions/manual included with your bread machine in order to use it safely and effectively. Recipe instructions & settings may differ slightly depending on the brand & model of bread machine utilized.
- Always wear oven mitts/gloves when dealing with a bread machine. The bread pan and the rest of the bread machine can get very hot during the baking process. This means that the bread pan and bread machine is likely to be very hot when you attempt to remove a baked good from the bread machine and/or bread pan.
- Do not add the optional chopped walnuts if anyone who might eat this baked good has peanut and/or tree nut allergies. Always check friends, family & guests for potential food allergies. Also do not serve food with nuts to young children as nuts are a potential choking risk.
- For more easy bread machine recipes (e.g. white bread, pizza dough, cornbread, French bread, whole wheat bread, etc.), please visit Bread Dad’s main Bread Machine Recipes section.
If you liked this recipe, please leave a comment below & give it a 5 star rating. Jump to comment section
| 📌Follow Bread Dad on Facebook for recipes & baking tips! |
Want More Recipes? Try These Next
- Bread Machine Recipes – 90+ recipes for banana bread, sourdough bread, pizza dough, cinnamon raisin bread, etc.
- Bread Recipes – French bread, buttermilk bread, bagels, Italian bread, etc.
- Banana Bread Recipes – 60+ recipes for banana nut bread, eggless banana bread, chocolate chip banana bread, etc.
- Quick Bread Recipes – Recipes using baking soda such as pumpkin bread, cranberry bread, etc.
| Made this recipe today? Snap a photo & show it off on my Facebook page! |
Common Questions
What is gluten?
According to Wikipedia, gluten “is a mixture of proteins found in wheat (and all of its species and hybrids, such as spelt, kamut, and triticale), as well as barley, rye, and oats”. Therefore, gluten is found in breads and baked goods that use wheat & certain other grains as an ingredient.
What is wrong with gluten?
According to Wikipedia, “Gluten may cause both gastrointestinal and systemic symptoms for those with gluten-related disorders, including coeliac disease (CD), non-coeliac gluten sensitivity (NCGS), gluten ataxia, dermatitis herpetiformis (DH), and wheat allergy”. Therefore, gluten can cause serious health issues for some people.
Reference Sources
- Wikipedia, Banana
- Wikipedia, Banana Bread
- Wikipedia, Bread Machine
- Wikipedia, Gluten Free Diet
Bread Machine Gluten Free Banana Bread
Ingredients
- 1 1/4 Cups Bananas (ripe) – 288 grams – Roughly 2 1/2 large bananas
- 8 Tablespoons Unsalted Butter (softened) – 115 grams
- 2 Eggs (large)
- 2 Cups Gluten Free All Purpose Flour – 320 grams – This recipe is based on using gluten free all purpose flour (not measure for measure flour) that includes xanthan gum. See the tips section for more information.
- 1 Cup Light Brown Sugar (packed cup) – 215 grams
- 1 Teaspoon Vanilla Extract – 5 milliliters
- 1 Teaspoon Baking Soda – 5 grams
- 1 Teaspoon Baking Powder – 4 grams
- 1/2 Teaspoon Salt – 3 grams
Instructions
- Total Machine Time – approximately 1:40 hours. FYI – The machine will spend roughly 20 minutes mixing and 1:20 hours baking.
- Bread Machine Settings – Cake/Quick Bread, Light Color, 2 lb
- Lightly beat the eggs.
- Mash bananas with a fork.
- Soften the butter in your microwave.
- Unplug your bread machine and then remove the bread pan from the machine.
- Add the mashed bananas, butter and eggs into the bread pan and then add the other ingredients. Try to follow the order of the ingredients listed above so that liquid ingredients are placed in the bread pan first and the dry ingredients second. FYI – Before adding the ingredients to the bread pan, please read the premixing comment below. Also you do not add the optional chopped nuts or chocolate chips at this time. They are added later.
- Optional – Consider premixing the ingredients in a large mixing bowl (versus allowing the bread machine to mix them) and then pouring the mixed batter into the bread pan. This helps to prevent flour from sticking to the sides of the bread pan (and ruining the exterior of the banana bread). FYI – See the tips section for more information on premixing or "scraping" the sides of the bread pan with a soft spatula.
- Put the bread pan back into the bread machine, close the bread machine lid and then plug in the bread machine.
- Enter the bread machine settings (Cake/Quick Bread, Light Color) and press the start button. FYI – Before making this recipe, please READ the tips section below for more information regarding the cake/quick bread setting used to make banana breads. The setting may be called "quick bread", "cake/quick bread", "cake", etc. However, some manufacturers use the "quick bread" setting for rapid sandwich-type breads that use yeast (and not for quick breads such as banana bread that use baking powder/soda). Therefore, this setting can be very confusing… but the tips section below will help you to find the right setting to use on your machine. You need to enter the correct banana bread setting used by your SPECIFIC bread machine model or the banana bread could be under or overcooked.
- Optional – If you want to add chopped walnuts or mini chocolate chips to enhance your gluten free banana bread, please add them after the first bread machine mixing cycle and before the second mixing (final mixing).
- When the bread machine has finished baking the bread, unplug the bread machine, remove the bread pan and place it on a wooden cutting board. Use oven mitts when removing the bread pan because it will be very hot!
- After removing the bread pan from the bread machine, you should let the banana bread stay within the warm bread pan on a wooden cutting board for 10 minutes (as this finishes the baking process) before you remove the banana bread from the bread pan. Wear oven mitts.
- After the 10 minute "cooldown", you should remove the banana bread from the bread pan and place the banana bread on a wire cooling rack to finish cooling. Use oven mitts when removing the bread.
- You should allow the banana bread to completely cool before cutting. This can take up to 2 hours. Otherwise, the banana bread will break (crumble) more easily when cut.
- Please READ the Bread Dad tips section for extra information on how to make this recipe successfully and to avoid common bread machine problems with moister “quick bread” recipes such as banana bread.
Notes
Nutrition
Related Recipes
- Almond Flour Banana Nut Bread – Oven baked
- Gluten Free Blueberry Banana Bread – Oven baked
- Gluten Free Chocolate Chip Banana Bread – Oven baked
- No Butter Banana Bread – Oven baked
Please leave a comment & recipe rating in the comment box below. Thanks!