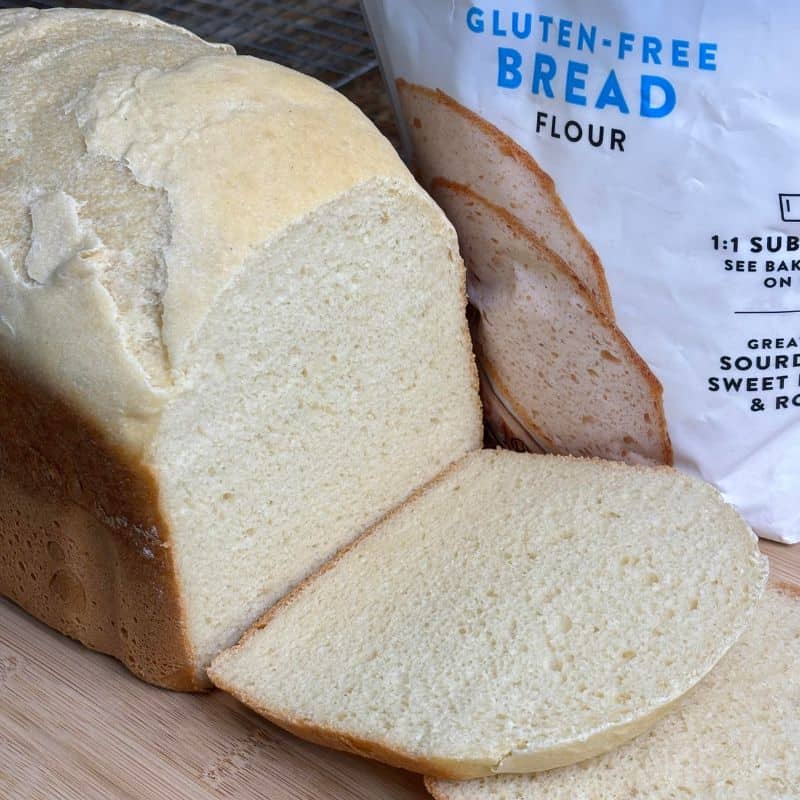
This bread machine gluten free bread recipe creates a delicious white bread. It uses simple ingredients such as milk, eggs and honey. For the best results, you should use gluten free bread flour (rather than a gluten free all purpose flour).
Recipe Sections
My recipe is for bread machines that have a gluten free setting. It will not work properly if you try to make it with a wheat-based bread machine setting (e.g. the basic/white bread setting).
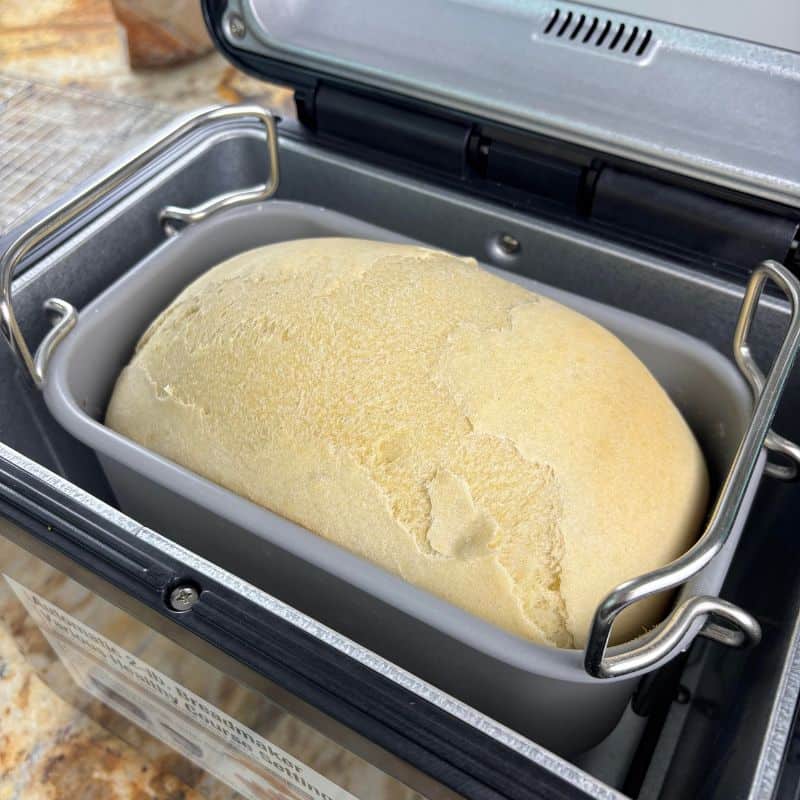
2 lb Bread Machine Gluten Free Bread in my Zojirushi
FYI – For details on how to make a 1 lb version of this recipe (for small compact bread machines), please visit my 1 lb Bread Machine Gluten Free Bread page.
Ingredients – 1.5 lb Loaf
- 1 1/4 Cups – Milk (warm)
- 3 Tablespoons – Olive Oil
- 3 Tablespoons – Honey
- 3 – Eggs (large) – Not extra large or jumbo eggs
- 1 Teaspoon – Apple Cider Vinegar
- 3 Cups – Gluten Free Bread Flour – You need to use a dedicated gluten free BREAD flour. Do NOT use a gluten free all purpose flour or single-ingredient gluten free flour (e.g. gluten free coconut flour). Make sure the GF bread flour includes binding agents (such as xanthan gum or psyllium husk). See the tips section below for more info.
- 1 Teaspoon – Salt – If you are using regular GF bread flour, you will need to add salt. However, if you are using a GF bread MIX, it often already contains salt (so you can skip adding any salt). Check the ingredient label to confirm.
- 1 Teaspoon – Bread Machine Yeast (Instant Yeast) – Do not use active dry yeast.
Ingredients – 2 lb Loaf
- 1 2/3 Cups – Milk (warm)
- 4 Tablespoons – Olive Oil
- 4 Tablespoons – Honey
- 4 – Eggs (large) – Not extra large or jumbo eggs
- 1 1/2 Teaspoons – Apple Cider Vinegar
- 4 Cups – Gluten Free Bread Flour – You need to use a dedicated gluten free BREAD flour. Do NOT use a gluten free all purpose flour or single-ingredient gluten free flour (e.g. gluten free coconut flour). Make sure the GF bread flour includes binding agents (such as xanthan gum or psyllium husk). See the tips section below for more info.
- 1 1/2 Teaspoons – Salt – If you are using regular GF bread flour, you will need to add salt. However, if you are using a GF bread MIX, it often already contains salt (so you can skip adding any salt). Check the ingredient label to confirm.
- 1 1/2 Teaspoons – Bread Machine Yeast (Instant Yeast) – Do not use active dry yeast.
Servings – Roughly 12 slices
Equipment Needed – Measuring cup & spoons, soft flexible spatula, oven mitts, wire cooling rack and a bread machine with a gluten free setting.
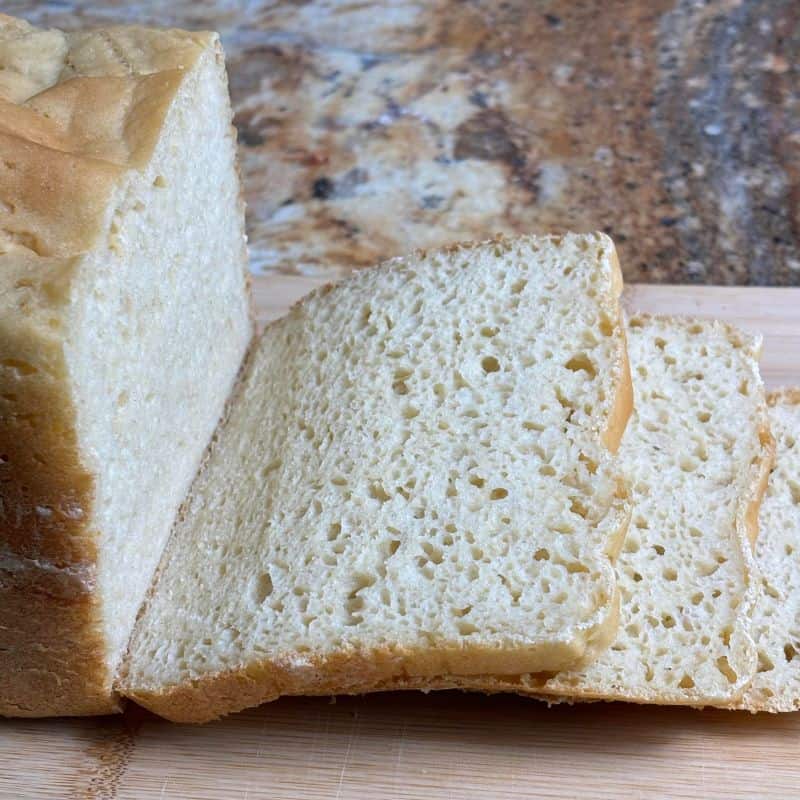
Flatter & Airier Bread Maker Gluten Free Bread (If You Use A Different GF Bread Flour)
Gluten Free Bread Dough with One Type of GF Bread Flour
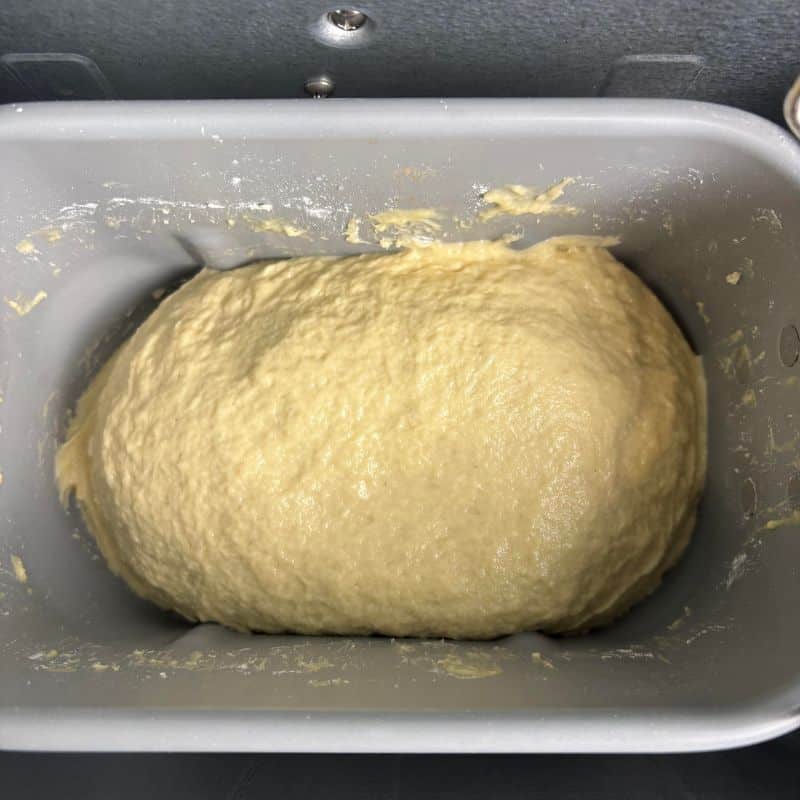
Consistency Differences – GF Bread Dough with Another GF Flour
Instructions
- Bread machine settings – Gluten free setting, light color crust and 1.5 lb or 2 lb loaf size.
- Unplug your bread machine.
- Remove the bread pan from the unplugged bread machine (so when you add the ingredients, they can not accidentally spill into the machine).
- Pour the milk into the bread pan and then add the other ingredients. Place the bread machine yeast in last and the yeast should not touch the liquid or salt (until the bread machine is turned on and the ingredients start to be mixed together by the bread machine).
- Put bread pan with ingredients back into the unplugged bread machine.
- Plug in bread machine. Enter the correct settings (gluten free setting, light color crust and 1.5 lb or 2 lb loaf size) and press the “start” button.
- Recommended – During the initial mixing, scrape the sides of the pan with a soft & flexible spatula because gluten free flour is harder to mix properly with a bread machine. The dough is initially more like a wetter batter and thus the GF flour can stick to the sides of the pan. See the tips section below for more information.
- When the bread machine has finished baking the bread, unplug the bread machine and remove the bread pan from the bread machine. Wear oven mitts as the bread pan & bread machine will be hot.
- Remove the bread from the bread pan and place the bread on a wire cooling rack. Use oven mitts when removing the bread as the bread & bread pan will be hot.
- Optional – Right after removing the bread from the bread pan (while the bread is still very hot), you can brush on 1 tablespoon of melted butter on the top crust of the bread machine gluten free bread (for a little extra flavor).
- Let the bread cool on the cooling rack for 1 to 2 hours before slicing the bread.
- Please read the tips section below for extra information on how to make this recipe successfully & to avoid common bread machine problems.
If you liked this recipe, please leave a comment & 5 star rating. Jump to comment section
📌 Save this recipe – Bookmark or pin it
| ❤️Love bread machine recipes? Then subscribe to my Bread Dad newsletter |
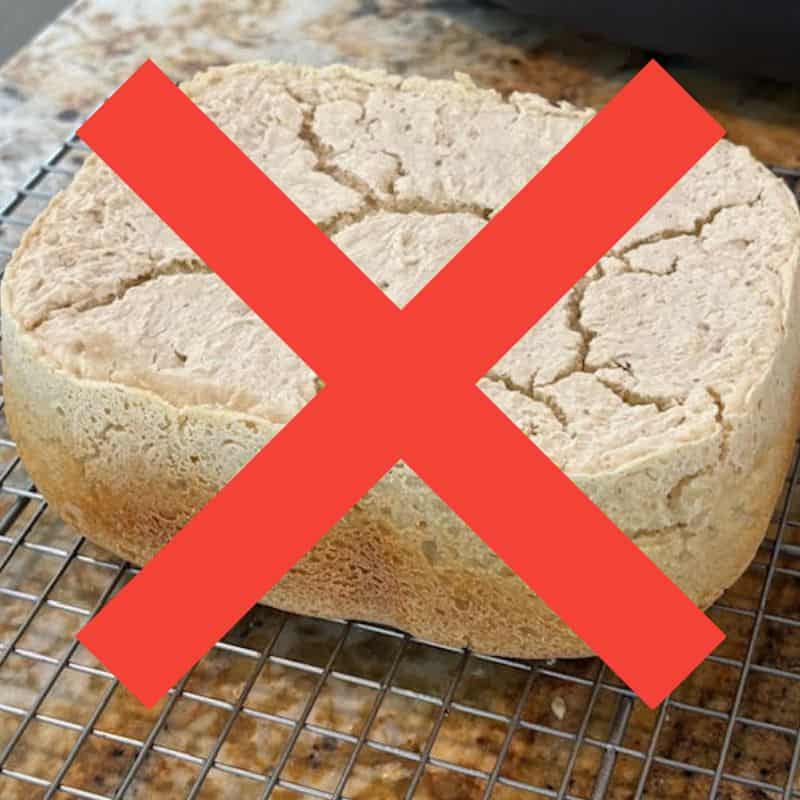
Failed Gluten Free Bread – Caused by using Gluten Free All Purpose Flour
Helpful Tips
- The tips below are designed to help bread machine “novices” and those who haven’t touched their bread machine in years.
- Click on this “print recipe” link if you want to print out this recipe. It includes all of the recipe’s ingredients and instructions. However, the recipe print function does not include my tips section. Please read the tips section in order to avoid common recipe problems.
- This recipe is part of Bread Dad’s series on easy Bread Machine Recipes such as buttery white bread, banana bread, multigrain bread and French bread.
- When making a bread machine gluten free bread recipe, you should read the labels on ALL of your ingredients to make sure the ingredients are gluten free and made in gluten free facilities (in order to avoid any potential cross-contamination issues).
- In my opinion, bread machine gluten free breads are less consistent to make versus traditional wheat-based breads. Why? Because they are impacted by things such as the lack of gluten (which provides structure to wheat-based breads), the characteristics of different types of GF flour (which often have different densities & moisture absorbency rates), manufacturers using different combinations of gluten free flours & ingredients, etc.
- The gluten free setting on bread machines is another reason for the differences & inconsistencies in bread machine gluten free bread. Different machines & models often have different mixing, proofing & rest times. These variations can impact gluten free bread since GF bread is often structurally weaker and requires more precise timing (versus traditional wheat-based breads). For example, differences in the proofing/rest times can lead to denser or fluffier gluten free bread.
- Nevertheless, here are some tips on how to get more consistent gluten free bread results. Of course, you will need to experiment a little and find a GF bread flour that works well with your machine and fits your family’s taste & dietary preferences.
- Important Tip 1 – Unless you own a large 2 paddle bread machine, you try my 1.5 lb recipe FIRST!! My 2 lb pound recipe is very large and fills up my 2 paddle Zojirushi (see pictures at the top of the page). Many supposed 2 lb capable bread machines (esp. 1 paddle machines) are better with my 1.5 lb recipes (and they have trouble making my 2 lb recipes).
- If you need help determining what size loaf best fits in your bread machine, you should check out my page on Bread Machine Pan Sizes. It covers a number of popular bread machines. The information on that page will help you to determine if your machine is better suited for Bread Dad’s 1 lb, 1.5 lb or 2 lb recipes.
- This page provides you with details on how to make 1.5 lb and 2 lb bread machine gluten free breads. If you have a small compact bread maker (with a gluten free setting!), you should try my 1 lb bread machine gluten free bread recipe.
- Important Tip 2 – Do not use the wrong type of gluten free flour. You need to use a dedicated gluten free BREAD flour and NOT a gluten free all purpose flour or a single ingredient type of GF flour (such as coconut flour). Gluten free bread flours are specially designed for making sandwich loaves with yeast. They are made with a blend of different GF flours, starches & binders in order to better mimic the structure of gluten.
- When I experimented making loaves with a number of different gluten free all purpose flours, my bread machine gluten free breads usually came out looking like bricks (see bread failure photo above). It took Bread Dad a while to figure out what was going wrong!! If you read the information on the packages for gluten free all purpose flour, they are better suited for making GF cookies, cakes and pie crusts. Some packages even tell you that their GF AP flour is “not recommended” for “yeasted recipes (breads, pizza, and buns)”.
- However, when I used dedicated gluten free bread flours (such as King Arthur Baking’s Gluten Free Bread Flour), my gluten free sandwich loaves came out fluffier and better looking & tasting!
- Important Tip 3 – You need to use a dedicated gluten free setting on a bread machine for this recipe. If your bread machine does not have a gluten free bread setting, this recipe will probably not work. A gluten free setting is designed specifically for making bread maker gluten free bread. This setting usually has less mixing time & more rising time than the standard basic/white bread setting on most bread machines. If you try to use the standard basic/white bread setting, the gluten free bread may come out overly dense, collapsed and/or gummy. The basic/white bread is designed for wheat-based breads and includes extra kneading and punch down phases that gluten free dough does not handle well.
- Many older bread machines do not have a gluten free setting. My bread maker gluten free bread recipe will probably not work in machines without a gluten free bread setting.
- Important Tip 4 – Do not replace or eliminate the eggs in my recipe. The protein of the eggs helps with the binding and structure of the bread. Since gluten free bread lacks gluten, it needs other ingredients (e.g. eggs and/or xanthan gum) to help provide some structure to the bread. Eggs also improve the rise of the bread because they help to capture some of the CO2 put out by the yeast.
- Important Tip 5 – During the mixing, make to sure to scrape the sides of the bread pan interior with a soft flexible spatula. Gluten free bread recipes are initially moister than wheat-based bread recipes and this making the mixing & kneading tougher to do in a bread machine. Many GF flours are slower to absorb moisture than wheat-based flours. You will get more GF flour sticking to the sides of the pan. Therefore, you will need to scrape the sides of the pan with a soft flexible spatula in order to make sure all of gluten free flour is being properly mixed.
- Visitors – If you have any other important tips for making gluten free bread in a bread machine, please post them in the comment section below.
- Optional – You can add 1 or 2 teaspoons of dried rosemary in order to create a gluten free herb bread.
- Optional – You can also experiment with other “lightweight” gluten free ingredients such as onion flakes or chopped up chives. They are an easy way to add extra flavor to a gluten free bread machine bread.
- Important – Just make sure to check the label of any extra ingredient additions to make sure they are gluten free and made in gluten free facilities (in order to avoid any potential cross-contamination issues).
- I do not recommend adding heavier ingredients (such as chopped nuts or dried fruit) because they may sink to the bottom of the bread. The lack of gluten means there is less structural support to hold up & evenly distribute heavier ingredients.
- Optional – Right after removing the gluten free bread machine bread from the bread pan (while the bread is still very hot), you can brush on 1 tablespoon of melted butter on the top crust of the bread machine gluten free bread. I like to use a pastry brush.
- This adds a nice buttery flavored crust to the gluten free bread machine bread. However, do not attempt to brush the butter on after the bread has cooled or you might create a mess (e.g. butter dripping off the loaf) and/or a greasy feeling crust. The melted butter will not be properly absorbed into the crust (if the loaf is cold).
- Visitors – What do you like to add to your bread machine gluten free bread? Dried herbs? Onion flakes? Chives? Please post your gluten free “flavor” ideas and additions in the comment section below.
- Be aware that gluten free bread flours are not the same. Manufacturers often use different blends of gluten free flours to make their bread flours. This can result in different tastes and textures. For example, when I used King Arthur Baking’s gluten free bread flour to make this recipe, my gluten free bread tasted more like a traditional sandwich bread. In contrast, when I tested Pamela’s gluten free bread mix to make this recipe, my gluten free bread tasted moister and almost a little cake-like. It also had a flatter top and airier crumb. Pick one based on your family’s dietary & taste preferences.
- To illustrate the difference in gluten free flour blends, when I wrote this recipe in 2026, the ingredient label on the King Arthur Baking gluten free bread flour included ingredients such as gluten free wheat starch, corn starch, sorghum flour, etc. In contrast, the ingredient label on Pamela’s gluten free bread mix included ingredients such as white rice flour, sorghum flour, tapioca starch, etc.
- FYI – I am not sponsored by any of the flour manufacturers mentioned on this page. I just wanted to test a variety of gluten free flours to make sure my recipe worked with different GF flours (as the ingredients in GF flours often differ by manufacturer).
- In addition, since gluten free flours often use different ingredients & flour combinations, you need to find a gluten free flour that matches your family’s dietary needs & preferences. Always check the ingredient label to see if a gluten free bread flour contains any ingredients that your family needs to avoid.
- Be aware that GF bread MIXES usually already include salt in the package. Therefore, you should not add any salt when making this recipe if you use a GF bread mix (because it already contains the salt). However, check the ingredient label on the mix to confirm if the mix includes salt.
- You don’t want to accidentally add a double amount of salt (bread mix salt plus recipe salt) or the yeast will have a harder time growing properly. Cough, cough… Bread Dad made this error when I was first testing the GF bread mixes!!
- For example, the King Arthur Baking Gluten Free Bread Flour does not include extra salt (so you will need to add salt as per my recipe). In contrast, Pamela’s Gluten Free Bread Mix and Bob’s Red Mill Gluten Free Bread Mix already include the salt in their packaged mixes (so you should NOT add any extra salt if you use these GF mixes).
- To further illustrate this issue, according to their ingredient labels in 2026, King Arthur Baking Gluten Free Bread Flour has 30 mg of sodium per 1/4 cup. In comparison, Pamela’s Gluten Free Bread Mix has 260 mg of sodium per 1/4 cup. Huge difference in the amounts of salt and this can throw off recipes.
- Unfortunately, the problem with using a gluten free bread mix that already contains salt, it makes it more difficult to accurately measure the salt needed to moderate/control the growth of the bread machine yeast. It is easier to add the correct amount of salt if you use a GF flour that lacks any added salt.
- Visitors – What gluten free bread flour or mix do you like to use to make your bread maker gluten free bread? Help others to find a brand that works best to make great gluten free bread machine bread! Please post your GF flour favorites in the comment section below.
- Binding agents (such as xanthan gum or psyllium husk) are not included in my recipe. Why? Because they are included in many dedicated gluten free bread flour blends.
- Nevertheless, double check your gluten free bread flour to make sure it includes ingredients such as xanthan gum or psyllium husk. These binding agents help to improve the structure & rise of GF bread.
- If you need gluten free bread flour to make this gluten free bread machine recipe, check out Bread Dad’s page for Gluten Free Flour & Mixes.
- Depending on the GF flour used, you might get more lumpy or slightly misshaped crusts. This is due to the lack of gluten which provides much of the “structure” to wheat-based breads. Moreover, there are differences in gluten free flour “formulations” (as manufacturers often use combinations of different GF flours) and this can throw things off. A bread recipe might work well with one type of GF flour/mix but it might not work as well with another type of flour.
- Be aware that it is usually harder to get a nice rounded loaf top with many bread maker gluten free bread recipes. The lack of gluten impacts the structural integrity of the loaf top. Bread machine gluten free breads often have a flatter top crust.
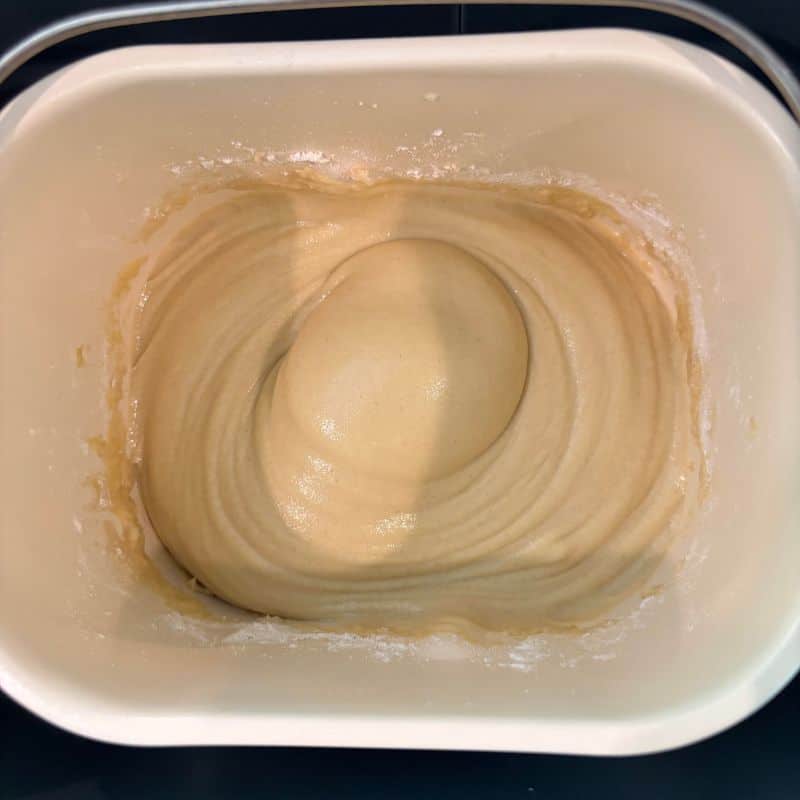
- Do not expect a “normal” bread dough ball. Given the slower moisture absorption of many gluten free flours (versus wheat-based bread flour), the dough in your bread machine may look more like semi-wet batter (instead of a traditional dough ball) when it is being mixed & kneaded.
- In the pictures further up on the page, you will see a dough made with King Arthur Baking Gluten Free Bread Flour. In addition, there is a wetter looking dough made with Pamela’s Gluten Free Bread Mix.
- Be aware that some bread maker gluten free breads tend to be a little denser than wheat-based sandwich breads (due to the lack of gluten). Again this depends on the type of GF flour being used.
- However, my recipe is pretty fluffy given the use of eggs, olive oil, vinegar and honey. These ingredients help to create a softer, fluffier & moister bread maker gluten free bread.
- Homemade gluten free bread tastes the best on the day that it is made. Unfortunately, given the characteristics of some gluten free flours, gluten free bread machine bread often dries out faster than wheat-based bread.
- If you are new to gluten free flours, be aware that gluten free flour is more expensive than many supermarket wheat-based flours.
- My bread machine gluten free bread recipe uses a lot of eggs. Why? As I stated near the top of the tips section, the protein of the eggs helps with the binding and structure of the bread. Since gluten free bread lacks gluten, it needs other ingredients (e.g. eggs and/or xanthan gum) to help provide some structure to the bread. Eggs also improve the rise of the bread because they help to capture some of the CO2 put out by the yeast.
- I would not recommend replacing the eggs in this recipe with egg substitutes such as “flax eggs”. Many egg substitutes often lack the binding & structural benefits of chicken eggs when making gluten free bread. If you try to make my gluten free bread machine recipe with some types of egg substitutes, the GF bread might come out denser and more fragile/crumbly.
- My recipe uses olive oil instead of butter. The use of olive oil/vegetable oil improves the moistness of the bread (as GF breads often can taste drier than wheat-based breads). When I experimented with butter instead of olive oil, my GF breads had a nice flavor but tasted too dry. I prefer to use a mild olive oil but you can also use other neutral tasting vegetable oils such as corn oil.
- I used honey in this recipe instead of white granulated sugar or light brown sugar. Why? Honey is more hygroscopic (meaning it attracts and retains moisture) than white granulated sugar and light brown sugar. Therefore, honey helps to make the bread taste softer & moister. This is especially helpful for gluten free breads (which sometimes taste drier than wheat-based breads).
- My bread maker gluten free bread includes apple cider vinegar. Why? Because it helps create a softer & less dense bread when using gluten free flours. The vinegar helps the dough to hold onto the gas bubbles, which improves the rise of the bread (especially when combined with binders such as xanthan gum). It also improves the texture of the starches of the gluten free bread machine bread and this results in a less crumbly bread.
- I am not including any metric weight measurements for this bread maker gluten free bread machine recipe because different GF flours often have different weights per cup (as they often use different combinations of GF flour). These weight differences between the different manufacturers could throw off my recipe.
- If you like gluten free bread machine recipes, check out my recipe for Bread Machine Gluten Free Banana Bread. It makes a nice & moist gluten free snack or dessert.
- Do NOT use cold milk. The main problem with using regular milk is that people tend to use cold refrigerated milk and this can slow the yeast growth. The ideal temperature for milk (and other liquids) used in most bread machine recipes is around 100 to 110 F.
- Optional – If you don’t have or can’t drink dairy milk, you can use plant-based milks such as plain soy milk or oat milk. You can even use water in a pinch. I just like using milk because it adds some extra flavor to the bread.
- Try to keep your ingredients (e.g. gluten free flour) in airtight food containers in order to extend their shelf life. Airtight containers protect ingredients from moisture (in the air), pests, dust, slows oxidation, etc.
- Flour absorbs moisture from the air (if kept in an open bag and not an airtight container). This extra moisture throws off recipes and can lead to bread collapses, etc.
- You should let your bread COMPLETELY cool down before slicing. If you try cutting bread while it is still warm, you will squash & compress the bread and interfere with the bread slowly releasing the steam/water vapor from the interior. Premature slicing can negatively impact the bread by making the bread more gummy. FYI – It can take 1 to 2 hours for a bread to completely cool.
- Cool your bread on a wire cooling rack. This type of rack allows moisture to escape via all the sides of the bread (including the bottom of the loaf). FYI – A lot of moisture escapes through the paddle hole in the bottom of the bread.
- If you place bread on a cutting board or plate to cool down, the bottom of the loaf will become soggy. The escaping moisture has nowhere to go and is trapped by the plate/cutting board. This means that the bottom of your bread just sits in the trapped moisture.
- This gluten free bread machine recipe was made & tested with bread machines such as my KBS and Zojirushi machines. In case you want to read a review of the bread machines that I use to create my recipes (with pros & cons), please visit my Best Bread Machines page.
- Visitors – What bread machine do you have? And does it have a gluten free setting? Please post details about your gluten free bread maker in the comment section below. This will help others to find a more capable gluten free bread machine.
- My gluten free bread machine recipe is based on using bread machine yeast (instant yeast). It has not been tested with active dry yeast.
- Bread machine yeast and instant yeast are not the same as active dry yeast. Bread machine yeast and instant yeast are added directly to the recipe’s ingredients. In contrast, active dry yeast must be activated in water/milk for 5 to 10 minutes before being added to a recipe’s ingredients. If you try to use active dry yeast for this recipe, it is less likely to work properly (as the recipe instructions & leavening time is based on the use of bread machine yeast). The use of active dry yeast may slow the rise of the bread.
- If you haven’t used your bread machine or bread maker in a long time, please buy some NEW bread machine yeast before making your bread. Old yeast can die or lose its potency and this will lead to bread that does not rise properly. Bread machine yeast is not likely to be viable if it has been sitting in your pantry for years.
- Many bakers like to make a pocket in the top of the flour in order to hold the bread machine yeast in place (looks sort of like a small flour volcano with a yeast crater). This is done to prevent the yeast from falling into the liquid ingredients (and activating prematurely) or coming into contact with the salt until the bread machine is turned on.
- I like to place the yeast in the center of the bread pan and the salt on the side of the pan. You want to keep the yeast and salt separated because the salt can kill the yeast.
- In regards to any gluten-related medical or health issues, please see your doctor. Bread Dad does not provide any health or medical advice.
- Before using your GF bread machine, you should always read your bread machine manufacturer’s instruction manual in order to use your bread machine effectively and safely.
- Always wear oven mitts/gloves when dealing with a bread machine. The bread pan and the rest of the bread machine can get very hot during the baking process. This means that the bread pan and bread machine is likely to be very hot when you attempt to remove a baked good from the bread machine and/or bread pan.
- For more bread recipes, please explore Bread Dad’s section on Bread Machine Recipes.
If you liked this recipe, please leave a comment & 5 star rating. Jump to comment section
| 📌Follow Bread Dad on Facebook for recipes & baking tips! |
Want More Recipes? Try These Next
- Bread Machine Recipes – 90+ recipes for banana bread, sourdough bread, pizza dough, cinnamon raisin bread, etc.
- Bread Recipes – French bread, buttermilk bread, bagels, Italian bread, etc.
- Banana Bread Recipes – 60+ recipes for banana nut bread, eggless banana bread, chocolate chip banana bread, etc.
- Quick Bread Recipes – Recipes using baking soda such as pumpkin bread, cranberry bread, etc.
| Made this recipe today? Snap a photo & show it off on my Facebook page! |
Reference Sources
- Wikipedia, Bread Machine
- Wikipedia, Gluten
- Wikipedia, Gluten-Free Diet

Bread Machine Gluten Free Bread – 1.5 lb & 2 lb Recipes
Ingredients
1.5 lb Loaf
- 1 1/4 Cups Milk (warm)
- 3 Tablespoons Olive Oil
- 3 Tablespoons Honey
- 3 Eggs Large eggs – not extra large or jumbo eggs
- 1 Teaspoon Apple Cider Vinegar
- 3 Cups Gluten Free Bread Flour – You need to use a dedicated gluten free BREAD flour. Do NOT use a gluten free all purpose flour or single-ingredient gluten free flour (e.g. gluten free coconut flour).
- 1 Teaspoon Salt – If you are using regular GF bread flour, you will need to add salt. However, if you are using a GF bread MIX, it often already contains salt (so you can skip adding any salt). Check the ingredient label to confirm.
- 1 Teaspoons Bread Machine Yeast (Instant Yeast)
2 lb Loaf
- 1 2/3 Cups Milk (warm)
- 4 Tablespoons Olive Oil
- 4 Tablespoons Honey
- 4 Eggs Large eggs – not extra large or jumbo eggs
- 1 1/2 Teaspoons Apple Cider Vinegar
- 4 Cups Gluten Free Bread Flour – You need to use a dedicated gluten free BREAD flour. Do NOT use a gluten free all purpose flour or single-ingredient gluten free flour (e.g. gluten free coconut flour).
- 1 1/2 Teaspoons Salt – If you are using regular GF bread flour, you will need to add salt. However, if you are using a GF bread MIX, it often already contains salt (so you can skip adding any salt). Check the ingredient label to confirm.
- 1 1/2 Teaspoons Bread Machine Yeast (Instant Yeast)
Instructions
- Bread machine settings – Gluten free setting, light color crust and 1.5 lb or 2 lb loaf size.
- Unplug your bread machine.
- Remove the bread pan from the unplugged bread machine (so when you add the ingredients, they can not accidentally spill into the machine).
- Pour the milk into the bread pan and then add the other ingredients. Place the bread machine yeast in last and the yeast should not touch the liquid or salt (until the bread machine is turned on and the ingredients start to be mixed together by the bread machine).
- Put bread pan with ingredients back into the unplugged bread machine.
- Plug in bread machine. Enter the correct settings (gluten free setting, light color crust and 1.5 lb or 2 lb loaf size) and press the “start” button.
- Recommended – During the initial mixing, scrape the sides of the pan with a soft & flexible spatula because gluten free flour is harder to mix properly with a bread machine. The dough is initially more like a wetter batter and thus the GF flour can stick to the sides of the pan. See the recipe's tips section on Bread Dad (BreadDad.com) for more information.
- When the bread machine has finished baking the bread, unplug the bread machine and remove the bread pan from the bread machine. Wear oven mitts as the bread pan & bread machine will be hot.
- Remove the bread from the bread pan and place the bread on a wire cooling rack. Use oven mitts when removing the bread as the bread & bread pan will be hot.
- Optional – Right after removing the bread from the bread pan (while the bread is still very hot), you can brush on 1 tablespoon of melted butter on the top crust of the bread machine gluten free bread (for a little extra flavor).
- Let the bread cool on the cooling rack for 1 to 2 hours before slicing the bread.
- Please read the recipe's tips section on Bread Dad (BreadDad.com) for extra information on how to make this recipe successfully & to avoid common bread machine problems.
Notes
Nutrition
Related Pages
- Bread Machine Gluten Free Banana Bread
- 1 lb Bread Machine Gluten Free Bread – Small loaf
- Gluten Free Blueberry Banana Bread – Oven baked
- Gluten Free Chocolate Chip Banana Bread – Oven baked
- Gluten Free Flour & Mixes
Please leave a comment & recipe rating in the comment box below. Thanks!