This 1 lb bread machine cheese bread recipe helps you to create a delicious sandwich bread. It is also perfect for making grilled cheese sandwiches. Why? Because the cheese bread makes the sandwiches extra cheesy!

Recipe Sections
This 1 lb bread machine recipe is ONLY for small compact bread machines (such as the Briskind Compact Bread Maker or Zojirushi Mini Breadmaker). 1 lb bread machine recipes do NOT work well in large bread machines that have 2 lb or greater loaf capacities. See my tips section below for more information.
Bread Machine Cheese Bread – Cooling Down After Baking

If you are looking for my 1.5 lb and 2 lb loaf versions, please visit my main Bread Machine Cheese Bread page. That page has my cheese bread recipes which are designed for larger bread machines.
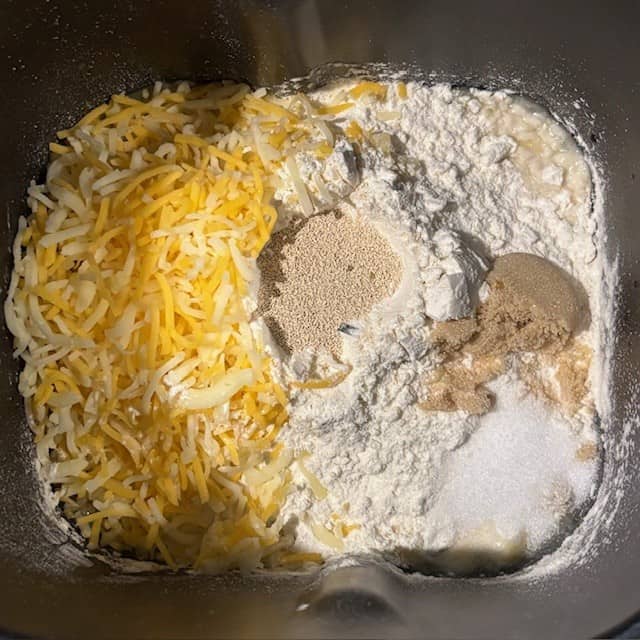
Ingredients – 1 lb Bread Machine Cheese Bread
- 9 Tablespoons – Milk (warm) – 135 milliliters – FYI – 9 tablespoons is equivalent to 1/2 cup and 1 tablespoon.
- 2 Tablespoons – Unsalted Butter (softened) – 29 grams
- 1 1/2 Cups – Bread Flour – 180 grams
- 1/2 Cup – Shredded Cheese – 56 grams – Use a strong tasting cheese (e.g. extra sharp cheddar) or the bread can taste bland.
- 1/2 Tablespoon – Light Brown Sugar – 7 grams
- 3/4 Teaspoon – Salt – 4.5 grams
- 3/4 Teaspoon – Bread Machine Yeast (Instant Yeast) – 2.3 grams – Not active dry yeast
- Optional – 1/2 or 1 diced jalapeno, 1 or 2 minced & fried garlic cloves OR 1 or 2 tablespoons of thinly sliced chives/scallions (green stalks only)
Servings – Roughly 12 slices
Equipment Needed – Measuring cup & spoons, silicone spatula, oven mitts, cooling rack and a bread machine.
Ingredients for Bread Machine Cheese Bread in Bread Pan
Instructions
- Bread machine settings – 1 lb, light color and “basic/white” bread setting.
- Unplug the bread machine & remove the bread pan.
- Soften the butter in a microwave. FYI – I like to semi-melt the butter for better “mixability”.
- Pour the milk & butter into the bread pan and then add the other ingredients (including the cup of cheese). Place the bread machine yeast in last and the yeast should not touch the liquid or salt (until the bread machine is turned on and the ingredients start to be mixed together).
- Optional – For greater flavor, you can also add diced jalapenos, minced & fried garlic cloves or thinly sliced chives/scallions (green stalks). For best results, just pick one additional “flavor” ingredient (e.g. just jalapenos). Place optional ingredient on the side of the bread pan and not on top of the yeast.
- Place the bread pan (with ingredients) back into the unplugged bread machine.
- Plug in the bread machine. Enter the correct settings (1 lb, light color & basic/white bread) and press the “start” button.
- Optional – After the FINAL kneading cycle and right BEFORE the baking cycle commences, sprinkle a little extra shredded cheese on top of the dough. For safety reasons, do not place your hands inside the bread machine. FYI – Do not open the lid DURING the baking cycle because this will negatively impact the bread. In most small bread machines, the baking cycle starts during the final 50 to 60 minutes of a total machine time of approximately 2:45 to 3 hours. Nevertheless, machine times can vary by model & manufacturer, so check your instruction manual to see when the baking cycle starts on YOUR specific bread machine.
- When the bread machine has finished baking the bread, unplug the bread machine and remove the bread pan. Wear oven mitts as the bread pan will be very hot.
- Remove the bread from the bread pan and place it on a cooling rack. Use oven mitts when handling the bread pan and bread as they will be very hot.
- Please read the tips section below for extra information on how to make this recipe successfully and how to avoid common bread machine problems.
If you liked this recipe, please leave a comment below & give us a 5 star rating. Jump to comment section
📌 Save this recipe – Bookmark or pin it
| ❤️Love bread machine recipes? Then subscribe to my Bread Dad newsletter |
Helpful Tips
- The tips below are designed to help bread machine “novices” and those who haven’t touched their bread machine in years.
- Click on this “print recipe” link if you want to print out this recipe. It includes all of the recipe’s ingredients and instructions. However, the recipe print function does not include my tips section. Please read the tips section in order to avoid common recipe problems.
- This recipe is part of Bread Dad’s series on easy 1 lb Bread Machine Recipes such as banana bread, whole wheat bread, oatmeal bread and multigrain bread.
- This recipe creates a 1 lb version of my popular Bread Machine Cheese Bread (which is focused on making 1.5 & 2 lb loaves).
- As I stated at the top of the page, this recipe is ONLY for small compact bread machines.
- 1 lb bread machine recipes generally do NOT work well in larger machines with 2 lb loaf capacities, especially if the machines have 2 paddles or a wide horizontal bread pan. However, some visitors have success making 1 lb recipes in a 2 lb “compact” bread machine with a vertical-oriented bread pan (a pan with a square bottom that mainly pushes the bread upwards versus a pan with a wide rectangular bottom)
- FYI – I have added a page to Bread Dad with Bread Machine Pan Sizes for a number of popular bread machines. This should help you to determine if your machine is best suited for Bread Dad’s 1 lb, 1.5 lb or 2 lb recipes.
- WARNING – Since 1 lb recipes use smaller amounts of ingredients, it is easier to mess up 1 lb recipes!! There is less room for measuring errors versus larger loaves. To make 1 lb loaf recipes successfully, you need to measure accurately (no eyeballing ingredients).
- The top of your bread can sometimes be a little lumpy due to the smaller amounts of ingredients in a 1 lb loaf. Why? Because, as I stated above, there is less room for measurement errors in small loaves versus large loaves. A little too much moisture or flour has a bigger impact on a 1 lb loaf versus a 2 lb loaf.
- Use a STRONG tasting cheese (e.g. extra sharp cheddar) for the best results. Mild or bland cheeses are much harder to taste in the finished bread. Strong tasting cheeses will stand out more. Just make sure to pick a strong flavored cheese that your family actually likes (e.g. cheddar). Some powerful cheeses (e.g. Limburger) are scary!!!
- If you want to learn about the hundreds of different cheeses that you could use in this recipe, I would suggest that you read this Wikipedia article on various cheese types.
- Optional – For a “cheesier” appearance, you can sprinkle a little cheese on top of the dough after the second & final mixing/kneading cycle has finished (and before the baking cycle commences). However, don’t add too much shredded cheese to the top of the dough after the final kneading… or your bread top might become a sticky mess! Just a little sprinkle of cheese.
- Visitors – What cheese did you use to make this cheese bread? Please leave your cheese selections & ideas in the comment section below.
- Some cheeses used by my visitors (when making my 1.5 lb & 2 lb cheese breads) – Asiago cheese, sharp cheddar, Monterey Jack, Swiss Gruyere, Mexican hot cheese, pepper jack cheese, vegan cheese, etc.
- Optional – For a spicier cheese bread, you can add 1/2 or 1 jalapeno (diced into small chunks). Of course, always be careful when cutting up hot peppers as the juice & oils can irritate or burn your skin, etc. Many people like to wear gloves when slicing up hot peppers.
- Optional – You can create a garlic cheese bread by mincing & frying 1 or 2 large cloves of garlic. I prefer not to use dehydrated garlic powder because garlic powder has an antimicrobial effect that slows or kills yeast. In my experience, if you fry the minced garlic, it seems to eliminate this antimicrobial problem (whereas just dehydrating the garlic does not).
- Optional – Another way to boost your cheese bread flavor is to add 1 or 2 tablespoons of diced green onions or diced chives.
- Optional – Turn this bread into a bacon & cheese bread by adding 1 or 2 tablespoons of bacon bits.
- Optional – If you want to add some fiber to this bread, you can replace 50% of the bread flour in the recipe with whole wheat flour. Don’t replace all of the bread flour or the bread will have trouble rising properly, experience loaf “moisture” issues (as whole wheat flour absorbs more liquid than bread flour), etc.
- Visitors – What ingredient “extras” do you like to add to your cheese bread? Jalapenos? Bacon bits? Garlic? Other? Please post your additions in the comment section below.
- To make my 1 lb bread maker recipes, I own & use a Briskind Compact Bread Maker Machine. In case you are interested, another popular (but more expensive) bread machine focused on making 1 lb loaves is the Zojirushi BB-HAC10 Mini Breadmaker. Many of my visitors also have success making 1 lb loaves with the Cuisinart Compact Bread Maker (model # CBK-110).
- In case you are looking at getting a bread machine to make 1 lb recipes, here are some of the benefits of a small compact bread machine; 1 lb loaves are perfect for single people or people who don’t want a ton of bread, a compact machine takes up less space in the kitchen (so more convenient for an apartment versus buying a giant bread machine), it uses less energy than a large bread machine, it creates smaller sandwich slices (sometimes, in my opinion, the slices from 2 lb loaves are too large – especially for kids), etc.
- The disadvantages of a small compact bread machine; small bread pan capacity (so you can’t make a larger loaf if you have guests coming over), not many online recipes are focused on 1 lb loaves, sometimes 1 lb loaves have more uneven crusts (vs bread made with larger horizontal bread pans), etc.
- Visitors – What compact bread machine did you use to make this recipe (such as Briskind Compact Bread Maker, Zojirushi Mini Breadmaker or Cuiniart Compact Bread Maker)? Please post your machine & any compact bread machine tips in the comment section below.
- Do NOT use cold milk. The main problem with using regular milk is that people tend to use cold refrigerated milk and this can slow the yeast growth. Try to use warm milk (or instant powdered milk mixed into warm water). If the milk is just coming out of the refrigerator and thus is too cold, I like to put the milk in my microwave for 15-20 seconds in order to warm it up. However, you should also be aware that the milk/water should not be too hot because very hot milk/water can kill the yeast.
- The ideal temperature for liquid ingredients used when making bread machine bread is around 100 to 110 F. Cold liquids (such as water & milk straight from the refrigerator) will slow yeast growth and liquid ingredients that are 140 F or above can kill the yeast. Some people like to use a digital bread thermometer in order to measure the temperature of their liquid ingredients.
- Optional – Consider using buttermilk instead of regular milk if you want to make an even softer & “richer” tasting cheese bread.
- Many bakers like to make a small pocket in the top of the flour in order to hold the bread machine yeast in place (looks sort of like a small flour volcano with a yeast crater). This is done to prevent the yeast from falling into the liquid ingredients (and activating prematurely), coming into contact with the salt, etc. until the bread machine is turned on.
- Always use FRESH ingredients (e.g. bread flour and yeast) for the best results. Ingredients that have been sitting in the pantry for months can become stale or pick up weird smells & flavors.
- Try to keep your ingredients (e.g. flour) in airtight food containers in order to extend their shelf life. Airtight containers protect ingredients from moisture (in the air), pests, dust, etc.
- Flour absorbs moisture from the air (if kept in an open bag and not an airtight container). This extra moisture throws off recipes and can lead to bread collapses, etc.
- Although 99% of the time my recipes do not need any extra attention, I still like to check the dough in my bread machine after the first 4 or 5 minutes of mixing. Factors such as flour absorbing moisture from the air, a humid kitchen or minor inaccuracies in measuring ingredients can all affect the dough’s consistency. If the dough is looking too wet (semi-soupy), I add some flour (a little bit at a time) until the dough consistency looks correct. Check your bread machine’s instruction manual on how to do this safely & effectively with your specific machine.
- You should let your bread COMPLETELY cool down before slicing. If you try cutting bread while it is still warm, you will squash & compress the bread and interfere with the bread slowly releasing the steam/water vapor from the interior. Premature slicing can negatively impact the bread by making the bread more gummy. FYI – It can take 1 to 2 hours for a bread to completely cool.
- Do not overbake your sandwich bread!! As soon as the bread machine done, you should remove the pan from the machine and then remove the bread from the pan. This applies to most sandwich breads made with a bread machine but always follow the recipe’s instructions for the best results.
- Do not forget the bread & let it sit in the bread machine or pan after the machine has finished baking. The residual heat will continue to bake the bread, drying it out and the loaf will turn into a rock!!
- Cool your bread on a wire cooling rack. This type of rack allows moisture to escape via all the sides of the bread (including the bottom of the loaf). FYI – A lot of moisture escapes through the paddle hole in the bottom of the bread.
- If you place bread on a cutting board or plate to cool down, the bottom of the loaf will become soggy. The escaping moisture has nowhere to go and is trapped by the plate/cutting board. This means that the bottom of your bread just sits in the trapped moisture.
- Use a serrated knife to cut your bread. A straight edge knife is more likely to squash the bread.
- This 1 lb bread machine recipe is based on bread flour (and not all purpose flour). A bread made with all purpose flour will NOT be as good as one made with bread flour. Most sandwich bread recipes use bread flour because bread flour has more gluten than all purpose flour. This helps to add “structure” to the bread and capture more of the CO2 “bubbles” put out by the bread yeast. Thus bread flour breads tend to be fluffier than all purpose flour breads.
- My bread machine recipe will NOT work if you use gluten free flour (instead of the bread flour called for in the recipe).
- FYI – Cheese bread is great for making grilled cheese sandwiches such as air fryer grilled cheese and oven baked grilled cheese. It makes the sandwiches doubly cheesy!
- This recipe uses bread machine yeast (instant yeast). It does NOT use active dry yeast.
- Bread machine yeast and instant yeast are not the same as active dry yeast. Bread machine yeast and instant yeast are added directly to the recipe’s ingredients. In contrast, active dry yeast must be activated in water/milk before being added to a recipe’s ingredients. If you try to use active dry yeast for this recipe, it is much less likely to work properly (as the recipe instructions & leavening time is based on the use of bread machine yeast). Examples of yeast that can be used for this recipe include Fleischmann’s Bread Machine Yeast, Fleischmann’s Instant Yeast, Saf Instant Yeast, Red Star Instant Yeast, etc. You should not use active dry yeasts for this recipe such as Fleischmann’s Active Dry Yeast, Red Star Active Dry Yeast, etc.
- I would recommend NOT reducing the salt in this recipe. You generally want to keep the salt-to-yeast ratio at a 1:1 basis in most bread recipes (1:1 based on teaspoons to teaspoons and NOT grams to grams). The salt moderates the growth of the yeast. If you cut the salt (and disrupt this 1:1 ratio), the yeast will grow faster than expected. In turn, this leads to more bread collapses (because the yeast rises too high and then craters in the middle) and/or results in “slack” less manageable dough. In addition, less salt will impact the flavor and browning of the bread.
- Do NOT place the yeast on top of or next to the salt. Salt kills yeast so it must be placed away from the yeast in the bread pan. I like to place my yeast in the middle of the bread pan (within a small “pocket” in center of the flour) and the salt on the side of the pan.
- If you haven’t used your bread machine or bread maker in a long time, please buy some NEW bread machine yeast before making your bread. Old yeast can die or lose its potency and this will lead to bread that does not rise properly. Bread machine yeast is not likely to be viable if it has been sitting in your pantry for years.
- Bread machine yeast loses its potency over time. Generally, bread machine yeast lasts for only 3-4 months after you have opened the bottle. However, if the yeast is exposed to air & moisture (e.g. the bottle is not sealed tight) or exposed to higher temperatures, the yeast will expire even more quickly.
- Once you have opened the bottle that contains the bread machine yeast, the yeast will last longer if you store the bottle in the refrigerator or freezer. Just make sure the bottle is sealed tight (as yeast will deteriorate quickly if exposed to air, moisture and/or heat).
- If your bread comes out too dense, it is likely due to one of the following reasons; You are using old or stale yeast, using a cold refrigerator temperature liquid (which slows yeast growth), baking in a cold winter temperature kitchen (yeast likes kitchen temps of 75-80 degree F), using all purpose flour (versus bread flour as called for in the recipe), placing salt on top of or next to the yeast (salt kills yeast so it must be placed away from the yeast in the bread pan), etc. For more reasons, you should visit Bread Dad’s Why Is My Bread Machine Bread So Dense? page.
- Cooler home temperatures in the winter can cause rising problems for bread dough. Ideally, your room temperature should be around 75-80 degrees F. Colder winter room temperatures can significantly delay the rise of the dough. You will need to raise the temperature of your kitchen (if you like a cold house in the winter) or find a warm spot for the dough to rise. I often put my dough (covered of course) next to a heating vent in the winter to make sure it is getting enough heat.
- Conversely, dough can rise faster than expected in a very hot kitchen.
- Kitchen humidity can impact a recipe. A winter kitchen tends to be drier due to your heating system drying out the air. In contrast, a kitchen in the summer can be much more humid. This change in humidity impacts baking as flour can soak up humidity from the air. Therefore, you might have to add 1-2 teaspoons of liquid in the winter if the dough is looking too dry. Or you might have to add 1-2 teaspoons of flour in the summer if the dough is looking too wet. If your kitchen is very dry or humid, you might have to add even a little more (but start with 1 teaspoon at a time until you achieve the right consistency). Of course, excessive kitchen humidity or dryness can impact a recipe at any time during the year (not just in the summer & winter)!
- This is one of the reasons that people should store flour in an airtight container if they have already opened the flour package. The flour will pick up extra moisture from the air while sitting in the pantry and this can throw off recipes, spoil flavor, degrade shelf life, etc.
- Having trouble with bread collapses & misshapen bread tops? Make sure to read Bread Dad’s article on Bread Machine Bread Collapses. It has reasons and solutions to potential bread collapses.
- For information on other possible errors, please visit my Common Bread Machine Mistakes page.
- If you have a problem with a “basic” bread machine recipe, please make sure that you are following the recipe exactly (e.g. using the correct bread machine settings), using the correct amount of an ingredient (e.g. don’t eyeball the measurements versus using a measuring cup or accidentally add a tablespoon when a teaspoon is called for), using the correct ingredients (e.g. bread machine yeast versus regular yeast or bread flour versus all purpose flour), etc. Please don’t “wing” things with recipes.
- If you start substituting ingredients (e.g. using different types of flour not called for in the recipe), you are experimenting and should not expect similar results to the recipe shown above. Experimenting can be fun. However, you should expect some successes but more potential disappointments when you start to experiment with recipes. For example, if you substitute whole wheat flour for bread flour, you will probably experience a problem (as whole wheat flour doesn’t rise nearly as well as bread flour). Moreover, whole wheat flour has a totally different flavor.
- You can also use this homemade bread to make one of Bread Dad’s hot & toasty Grilled Cheese & Panini Sandwich Recipes such as air fryer grilled cheese, chicken paninis and ham & cheese paninis.
- My recipes are based on US ingredient measurements (e.g. US cups & tablespoons). However, as a courtesy to our European visitors, I have also included some very ROUGH European equivalents (e.g. grams & milliliters). Since I rarely use European measurements when baking, please let me know in the comment section below if any of the European ingredient measurements need to be changed (e.g. for XYZ ingredient, milliliters are more commonly used versus the grams information listed in the recipe).
- Before using any bread machine, you should read the bread machine manufacturer’s instructions in order to use the bread machine effectively and safely.
- Always wear oven mitts/gloves when dealing with a bread machine. The bread pan and the rest of the bread machine can get very hot during the baking process. This means that the bread pan and bread machine is likely to be very hot when you attempt to remove a baked good from the bread machine and/or bread pan.
- For more easy bread ideas, please visit Bread Dad’s sections on Bread Machine Recipes and Homemade Bread Recipes.
If you liked this recipe, please leave a comment below & give us a 5 star rating. Jump to comment section
| 📌Follow Bread Dad on Facebook for recipes & baking tips! |
Want More Recipes? Try These Next
- Bread Machine Recipes – 90+ recipes for banana bread, sourdough bread, pizza dough, cinnamon raisin bread, etc.
- Bread Recipes – French bread, buttermilk bread, bagels, Italian bread, etc.
- Banana Bread Recipes – 60+ recipes for banana nut bread, eggless banana bread, chocolate chip banana bread, etc.
- Quick Bread Recipes – Recipes using baking soda such as pumpkin bread, cranberry bread, etc.
| Made this recipe today? Snap a photo & show it off on my Facebook page! |
Reference Sources
- Wikipedia, Bread
- Wikipedia, Bread Machine
- Wikipedia, Cheese

1 lb Bread Machine Cheese Bread
Ingredients
- 9 Tablespoons Milk (warm) – 135 milliliters – FYI – 9 tablespoons is equivalent to 1/2 cup and 1 tablespoon.
- 2 Tablespoons Unsalted Butter (softened) – 29 grams
- 1 1/2 Cups Bread Flour – 180 grams
- 1/2 Cup Shredded Cheese – 56 grams – Use a strong tasting cheese (e.g. extra sharp cheddar) or the bread can taste bland.
- 1/2 Tablespoon Light Brown Sugar – 7 grams
- 3/4 Teaspoon Salt – 4.5 grams
- 3/4 Teaspoon Bread Machine Yeast (instant yeast) – 2.3 grams – Not active dry yeast
Instructions
- Bread machine settings – 1 lb, light color and “basic/white” bread setting.
- Unplug the bread machine & remove the bread pan.
- Soften the butter in a microwave. FYI – I like to semi-melt the butter for better "mixability".
- Pour the milk & butter into the bread pan and then add the other ingredients (including the cup of cheese). Place the bread machine yeast in last and the yeast should not touch the liquid or salt (until the bread machine is turned on and the ingredients start to be mixed together).
- Optional – For greater flavor, you can also add diced jalapenos, minced & fried garlic cloves or thinly sliced chives/scallions (green stalks). For best results, just pick one additional "flavor" ingredient (e.g. just jalapenos). Place optional ingredient on the side of the bread pan and not on top of the yeast.
- Place the bread pan (with ingredients) back into the unplugged bread machine.
- Plug in the bread machine. Enter the correct settings (1 lb, light color & basic/white bread) and press the “start” button.
- Optional – After the FINAL kneading cycle and right BEFORE the baking cycle commences, sprinkle a little extra shredded cheese on top of the dough. For safety reasons, do not place your hands inside the bread machine. FYI – Do not open the lid DURING the baking cycle because this will negatively impact the bread. In most small bread machines, the baking cycle starts during the final 50 to 60 minutes of a total machine time of approximately 2:45 to 3 hours. Nevertheless, machine times can vary by model & manufacturer, so check your instruction manual to see when the baking cycle starts on YOUR specific bread machine.
- When the bread machine has finished baking the bread, unplug the bread machine and remove the bread pan. Wear oven mitts as the bread pan will be very hot.
- Remove the bread from the bread pan and place it on a cooling rack. Use oven mitts when handling the bread pan and bread as they will be very hot.
- Please read the recipe's tips section on Bread Dad (BreadDad.com) for extra information on how to make this recipe successfully and how to avoid common bread machine problems.
Notes
Nutrition
Related Recipes
- Bread Machine Cheese Bread – 1.5 & 2 lb loaf versions
- Bread Machine Italian Bread
- Bread Machine Pizza Dough
- 1 lb Bread Machine Banana Bread
- 1 lb Bread Machine White Bread
- 1 lb Bread Machine Whole Wheat Bread
Please leave a comment & recipe rating in the comment box below. Thanks!