This bread machine Jalapeno cheese bread recipe is simple to make and makes a nicely “hot” bread. The keys to this delicious recipe are the shredded cheese, fresh Jalapenos and butter.
Your family will love this Jalapeno cheese bread because it is a moderately spicy bread that can be used for sandwich lunches. For example, it is wonderful for a slightly spicier grilled cheese sandwich, ham & cheese sandwich, chicken salad sandwich, etc. This bread can also be used for dipping in soup, etc.
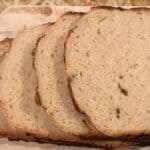
Delicious Jalapeno Cheese Bread

If your family really loves hot & spicy food, you can use 2 Jalapenos (versus the 1 Jalapeno used in the recipe below). However, if your family doesn’t like Jalapeno peppers, you can always try my regular (non-Jalapeno) Bread Machine Cheese Bread.
Key Ingredient – Jalapenos

Since this Jalapeno cheese bread recipe is done in a bread machine, it is simple & easy to make. It takes me roughly 5-10 minutes to prepare and then the bread machine does the rest of the work. FYI – Bread Dad has a printable and “pin-able” recipe at the bottom of the page.
Ingredients – Bread Machine – Jalapeno Cheese Bread
- 1 1/8 Cups – Milk (warm) – 267 milliliters – 1 1/8 cups of milk is equivalent to 1 cup and 2 tablespoons of milk.
- 4 Tablespoons – Unsalted Butter (softened) – 57 grams – I like to semi-melt the butter in my microwave. You can also replace the butter with olive oil.
- 3 Cups – Bread Flour – 360 grams
- 1 Cup – Shredded Cheese – 112 grams – Use a stronger flavored cheese or the bread may taste bland
- 1 – Jalapeno Pepper (diced into small bits) – 15 grams – Use 2 medium-sized jalapenos if you would like a “spicier” bread. However, jalapenos can vary a lot in size.
- 1 Tablespoon – Brown Sugar – 13 grams
- 1 Teaspoon – Italian Herbs – 2 grams – Optional ingredient – Skip this ingredient if you dislike herb breads.
- 1 1/2 Teaspoons – Salt – 9 grams
- 1 1/2 Teaspoons – Bread Machine Yeast – 5.4 grams
Servings – Roughly 12 slices
Equipment – Measuring cup & spoons, silicone spatula, oven mitts, cooling rack… and a bread machine.
Key Ingredient – Shredded Cheese

Instructions – Bread Machine Jalapeno Cheese Bread
- Bread machine settings – 2 pound loaf, light color and “basic/white” bread setting.
- Unplug your bread machine and then remove the bread pan.
- Pour the milk into the bread pan and then add the other ingredients including the diced Jalapeno. Place the bread machine yeast in last and the yeast should not touch the liquid (until the bread machine is turned on and the ingredients start to be mixed together).
- Place the bread pan back into the bread machine and then plug in the bread machine.
- Enter the correct settings (e.g. basic/white bread, 2 lb and light color) and press the start button.
- When the bread machine has finished baking the bread, unplug the bread machine. Remove the bread and place it on a cooling rack. Use oven mitts when removing the bread machine container (bread loaf pan) as it will be very hot!
- After removing the bread, don’t forget to remove the mixing paddle if it is stuck in the bread. Use oven mitts as the mixing paddle will be very hot coming out of the bread machine. Or wait until the bread is completely cooled and then remove the mixing paddle.
- In our bread machine, the baking takes about 3 hours for a 2 pound bread at the light color & basic bread settings. However, some machines can differ and you don’t want to be away from home when the bread machine “finished” alarm goes off! Your bread machine should show you the length of the baking time after you have entered the settings into the machine. This will allow you to know when to be in the kitchen in order to remove the bread.
- Before using your bread machine, you should read the bread machine manufacturer’s instructions in order to use the bread machine effectively and safely. In addition, some bread machines may operate slightly differently so please read the instructions from your bread machine manufacturer in order to learn about more about your machine’s exact baking process, kneading time, etc.
- Please read the tips section below for extra information on how to make this recipe successfully.
If you liked this recipe, please leave a comment below & give us a 5 star rating. Jump to comments section
📌 Save this recipe – Bookmark or pin it
| ❤️Love bread machine recipes? Then subscribe to my Bread Dad newsletter |
Tips – Jalapeno Cheese Bread Recipe
- The tips below are designed to help bread machine “novices” and those who haven’t touched their bread machine in years.
- Click on this “print recipe” link if you want to print out this recipe. It includes all of the recipe’s ingredients and instructions. However, the recipe print function does not include my tips section. Please read the tips section in order to avoid common recipe problems.
- This recipe is part of Bread Dad’s series on easy Bread Machine Recipes such as banana bread, French bread, bagels, pizza dough and multigrain bread.
- Use a strong flavored cheese (e.g. extra sharp cheddar cheese) if you want your bread to have a greater cheese flavor. A mild cheese might add little to no cheese flavor to the bread. Of course, for the best results, you should also make sure to use your family’s favorite cheese!
- Visitors – What cheese do you like to use when making a cheese bread? Please post your cheese ideas in the comment section below.
- Make sure you don’t confuse your chili peppers when purchasing your ingredients for this recipe. Jalapenos are moderately hot but some other peppers can be extremely spicy/hot (e.g. ghost peppers).
- I diced up the entire Jalapeno (seeds and all) when making this recipe. If you want things to be a little less “hot”, you can remove the seeds.
- Be careful when cutting jalapenos. It can be painful if you get any of the jalapeno juice in your eyes, a finger cut, etc. To avoid this issue, some people like to wear plastic kitchen gloves and glasses when cutting up jalapeno.
- If your family likes spicier foods (like my youngest son), you can use 2 jalapeno peppers (versus the single diced Jalapeno called for in the recipe).
- I don’t use pickled jalapenos because they can add a slight vinegary “pickled” taste to the bread. I would suggest using fresh jalapenos.
- However, be aware that a number of my visitors have used pickled jalapenos and said that the bread still comes out well (thanks Margaret!).
- If you use pickled jalapenos, you need to DRAIN OFF any of the pickle “juice”.
- Adding more liquid (more than called for in the recipe) will result in an underbaked bread and/or bread collapses.
- I like to check the dough about 5 minutes after the machine has started mixing. If it is looking too wet, I will add some flour (a little at a time) until the dough looks correct. Check with your machine’s instruction manual to see how to do this safely and effectively with your specific bread machine model.
- Adding lots of jalapenos (e.g. 4 jalapenos) can add unexpected moisture to the dough. You will need to offset this extra moisture with a little extra flour.
- Or you can use dehydrated jalapeno chips/slices if you want to avoid the issue of adding uncalled for moisture.
- Or if you want more jalapeno flavor without the potential moisture issues/problems, you can add a small amount of dried jalapeno flakes (in addition to the diced fresh jalapeno). If you don’t have dried jalapeno flakes, you can use “regular” dried red pepper flakes (which are often made from a variety of peppers such as cayenne pepper).
- Visitors – How many jalapenos do you like to add to your jalapeno cheese bread? And do you add any extra pepper flakes? Please leave your jalapeno & hot pepper thoughts and recipe variations in the comment section below.
- Optional – Some of my visitors like to add onions or fried garlic to my cheese bread recipes.
- Optional – Other visitors like to add some fried bacon (chopped into small bits) to their cheese bread.
- Optional – If you want a softer bread, you can replace the milk in the recipe with warm buttermilk. The slight acidity of buttermilk tenderizes the bread.
- Optional – If you don’t have butter, you can replace it with an equivalent amount of olive oil.
- Visitors – What extra ingredients do you like to add to your jalapeno cheese bread? Onions? Garlic? Chives? Herbs? Bacon? Please post your ingredient suggestions in the comment section below.
- Visitor variations – ScottR “used olive oil instead and added 1/2 of a sauteed Vadlia onion”
- If you like cheese breads, you might like to try my “regular” Bread Machine Cheese Bread & Bread Machine Garlic Cheese Bread recipes.
- Or you might like to try my oven baked Italian Herb & Cheese Bread recipe.
- You can use cheese bread to make even better (cheesier!!) sandwiches such as Air Fryer Grilled Cheese, Grilled Cheese Panini and Oven Baked Grilled Cheese.
- Do NOT use cold milk. This can slow the growth of the yeast and result in a denser bread. Yeast likes things warm (not too cold or too hot).
- The ideal temperature for liquid ingredients used when making bread machine bread is around 100-110 F. Cold liquids (such as water & milk straight from the refrigerator) will slow yeast growth and liquid ingredients that are 140 F or above can kill the yeast. Some people like to use a digital bread thermometer in order to measure the temperature of their liquid ingredients.
- I like to use whole milk for the extra flavor. However, you can also use 2% milk, skim milk or non-dairy milk such as soy milk or oat milk. Use the milk that is best based on your family’s preferences.
- Visitor tips – Carol stated “I found that adding the cheese to the bread maker at the beginning tears them up too much and using shredded versus small dice sort of hides any of the cheesy taste. It is important that the cheese cubes are small (about 1/8 inch). Otherwise the melting cheese leaves big holes in the loaf.”
- Always use FRESH ingredients (e.g. bread flour and yeast) for the best results. Ingredients that have been sitting in the pantry for months can become stale or pick up weird smells & flavors.
- Try to keep your ingredients (e.g. flour) in airtight food containers in order to extend their shelf life. Airtight containers protect ingredients from moisture (in the air), pests, dust, etc.
- Flour (if stored in an open bag and not in an airtight container) can absorb a lot of moisture from the air. This extra moisture throws off recipes and can lead to bread collapses, etc.
- This recipe will NOT work with gluten free flour. Gluten free flour differs significantly versus flours with gluten and requires you to use recipes specifically designed for the use of gluten free flour. If you use gluten free flour in this recipe, you are likely to have a baking disaster.
- This recipe uses bread machine yeast (instant yeast). It does NOT use active dry yeast.
- Bread machine yeast and instant yeast are not the same as active dry yeast. Bread machine yeast and instant yeast are added directly to the recipe’s ingredients. In contrast, active dry yeast must be pre-activated for 5-10 minutes in water/milk before being added to a recipe’s ingredients. If you try to use active dry yeast for this recipe, it is much less likely to work properly (as the recipe instructions & leavening time is based on the use of bread machine yeast).
- I would recommend NOT reducing the salt in this recipe. You generally want to keep the salt-to-yeast ratio at a 1:1 basis in most bread recipes (1:1 based on teaspoons to teaspoons and NOT grams to grams). The salt moderates the growth of the yeast. If you cut the salt (and disrupt this 1:1 ratio), the yeast will grow faster than expected. In turn, this leads to more bread collapses (because the yeast rises too high and then craters in the middle) and/or results in “slack” less manageable dough. In addition, less salt will impact the flavor and browning of the bread.
- If you haven’t used your bread machine in a long time, please buy some NEW bread machine yeast before making your bread. Old yeast can die or lose its potency and this will lead to bread that does not rise properly. Bread machine yeast may not be viable if it has been sitting in your pantry for years.
- Once you have opened the bottle that contains the bread machine yeast, the yeast will last longer if you store the bottle in the refrigerator or freezer. Just make sure the bottle is sealed tight (as yeast will deteriorate quickly if exposed to air, moisture and/or heat).
- If your dough is having trouble rising properly, you should check out my How To Test Yeast page. This yeast test will show you if your yeast is alive & active or dead/expired. It will save you from a few bread disasters!
- You should let your bread completely cool down before slicing. If you try cutting bread while it is still warm, you will squash & compress the bread and interfere with the bread slowly releasing the steam/water vapor from the interior. Thus premature slicing can negatively impact the bread by making the bread more gummy. FYI – It can take 1 to 2 hours for a bread to completely cool.
- If your bread comes out too dense, it is likely due to one of the following reasons; You are using old or stale yeast, using a cold refrigerator temperature liquid (which slows yeast growth), baking in a cold winter temperature kitchen (yeast likes kitchen temps of 75-80 degree F), using all purpose flour (versus bread flour as called for in the recipe), placing salt on top of or next to the yeast (salt kills yeast so it must be placed away from the yeast in the bread pan), etc. For more reasons, you should visit Bread Dad’s Why Is My Bread Machine Bread So Dense? page.
- Cooler home temperatures in the winter can cause rising problems for bread dough. Ideally, your room temperature should be around 75-80 degrees F. Colder winter room temperatures can significantly delay the rise of the dough. You will need to raise the temperature of your kitchen (if you like a cold house in the winter) or find a warm spot for the dough to rise. I often put my dough (covered of course) next to a heating vent in the winter to make sure it is getting enough heat.
- Conversely, dough can rise faster than expected in a very hot kitchen.
- Kitchen humidity can impact a recipe. A winter kitchen tends to be drier due to your heating system drying out the air. In contrast, a kitchen in the summer can be much more humid. This change in humidity impacts baking as flour can soak up humidity from the air. Therefore, you might have to add 1-2 teaspoons of liquid in the winter if the dough is looking too dry. Or you might have to add 1-2 teaspoons of flour in the summer if the dough is looking too wet. If your kitchen is very dry or humid, you might have to add even a little more (but start with 1 teaspoon at a time until you achieve the right consistency). Of course, excessive kitchen humidity or dryness can impact a recipe at any time during the year (not just in the summer & winter)!
- This is one of the reasons that people should store flour in an airtight container if they have already opened the flour package. The flour will pick up extra moisture from the air while sitting in the pantry and this can throw off recipes, spoil flavor, degrade shelf life, etc.
- If you would like to read my review of the bread machines that I own & use to create my bread machine recipes, please visit my Best Bread Machines page. It covers bread machines such as Briskind, Hamilton Beach and Zojirushi. The page provides my thoughts on the machines’ strengths and weaknesses.
- If you have a problem with a bread machine recipe, please make sure that you are following the recipe exactly (e.g. using right bread machine settings), using the correct amount of an ingredient (e.g. accidentally adding a teaspoon when a tablespoon is called for), using the correct ingredients (e.g. bread machine yeast versus active dry yeast or bread flour versus all purpose flour), etc. Don’t “wing” things with recipes.
- If you start substituting ingredients, you are experimenting and should not expect similar results to the recipe shown above. You can expect some successes but more potential disappointments when you start to experiment with recipes.
- Having trouble with bread collapses & misshapen bread tops? Make sure to read Bread Dad’s article on Bread Machine Bread Collapses. It has reasons and solutions to potential bread collapses.
- For information on other possible errors, please visit my Common Bread Machine Mistakes page.
- You can also use this homemade bread to make one of Bread Dad’s hot & toasty Grilled Cheese or Panini Sandwich Recipes such air fryer grilled cheese, chicken paninis and ham & cheese paninis..
- Always wear oven mitts/gloves when dealing with a bread machine. The bread pan and the rest of the bread machine can get very hot during the baking process. This means that the bread pan and bread machine is likely to be very hot when you attempt to remove a baked good from the bread machine and/or bread pan.
- For more easy bread machine ideas (e.g. banana bread, pizza dough & extra soft white bread), please visit Bread Dad’s main section on Bread Machine Recipes.
If you liked this recipe, please leave a comment below & give us a 5 star rating. Jump to comments section
| 📌Follow Bread Dad on Facebook for recipes & baking tips! |
Want More Recipes? Try These Next
- Bread Machine Recipes – 90+ recipes for banana bread, sourdough bread, pizza dough, cinnamon raisin bread, etc.
- Bread Recipes – French bread, buttermilk bread, bagels, Italian bread, etc.
- Banana Bread Recipes – 60+ recipes for banana nut bread, eggless banana bread, chocolate chip banana bread, etc.
- Quick Bread Recipes – Recipes using baking soda such as pumpkin bread, cranberry bread, etc.
| Made this recipe today? Snap a photo & show it off on my Facebook page! |
Questions about this Recipe
What is a Jalapeno?
A Jalapeno is a moderately hot pepper with a rating of 3,500 to 8,000 Scoville heat units. In contrast, hotter peppers such as the Habanero can be rated up to 100,000–350,000 on the Scoville scale. To learn more about the Scoville heat or spiciness rating system used for peppers, you should read this Wikipedia article.
Reference Sources
- Wikipedia, Bread Machine
- Wikipedia, Cheese
- Wikipedia, Jalapeno
Bread Machine – Jalapeno Cheese Bread
Ingredients
- 1 1/8 Cups Milk (warm) – 267 milliliters – 1 1/8 cups of milk is equivalent to 1 cup and 2 tablespoons of milk.
- 4 Tablespoons Unsalted Butter (softened) – 57 grams – I like to semi-melt the butter in my microwave. You can also replace the butter with olive oil.
- 3 Cups Bread Flour – 360 grams
- 1 Cup Shredded Cheese – 112 grams – Use a stronger flavored cheese or the bread may taste bland
- 1 Jalapeno Pepper (diced into small bits) – 15 grams – Use 2 medium-sized jalapenos if you would like a "spicier" bread. However, jalapenos can vary a lot in size.
- 1 Tablespoon Brown Sugar – 13 grams
- 1 Teaspoon Italian Herbs – 2 grams – Optional ingredient – Skip this ingredient if you dislike herb breads.
- 1 1/2 Teaspoons Salt – 9 grams
- 1 1/2 Teaspoons Bread Machine Yeast – 5.4 grams
Instructions
- Bread machine settings – 2 pound loaf, light color and “basic/white” bread setting.
- Unplug the bread machine and then remove the bread pan.
- Pour the milk into the bread pan and then add the other ingredients including the diced Jalapeno. Place the bread machine yeast in last and the yeast should not touch the liquid (until the bread machine is turned on and the ingredients start to be mixed together).
- Place the bread pan back into the bread machine and then plug in the bread machine.
- Enter the correct settings (i.e. basic/white bread, 2 lb and light color) and press the start button.
- When the bread machine has finished baking the bread, unplug the bread machine. Remove the bread and place it on a cooling rack. Use oven mitts when removing the bread machine container (bread loaf pan) as it will be very hot!
- After removing the bread, don’t forget to remove the mixing paddle if it is stuck in the bread. Use oven mitts as the mixing paddle will be very hot coming out of the bread machine. Or wait until the bread is completely cooled and then remove the mixing paddle.
- In our bread machine, the baking takes about 3 hours for a 2 pound bread at the light color & basic bread settings. However, some machines can differ and you don’t want to be away from home when the bread machine “finished” alarm goes off! Your bread machine should show you the length of the baking time after you have entered the settings into the machine. This will allow you to know when to be in the kitchen in order to remove the bread.
- Before using your bread machine, you should read the bread machine manufacturer’s instructions in order to use the bread machine effectively and safely. In addition, some bread machines may operate slightly differently so please read the instructions from your bread machine manufacturer in order to learn about more about your machine's exact baking process, kneading time, etc.
- Please read the recipe's tips section on Bread Dad (BreadDad.com) for extra information on how to make this recipe successfully.
Notes
Nutrition
Related Bread Recipes
- Bread Machine Buttermilk Bread
- Bread Machine French Bread
- Bread Machine Garlic Cheese Bread
- Bread Machine Italian Bread
- Bread Machine Pizza Dough
- Bread Machine White Bread
Please leave a comment & recipe rating in the comment box below. Thanks!