This bread machine Italian herb bread creates a great tasting Italian-style sandwich bread. It is perfect for Italian-themed sandwiches such as chicken parmesan sandwiches, porchetta sandwiches, meatball sandwiches and mozzarella, tomato & basil sandwiches (also known as Caprese sandwiches).
You can also use this Italian herb bread as an appetizer and dip it in olive oil. Or use it with cold cuts if you want to add some Italian flair to your child’s regular “boring” sandwich lunches. Or toast this bread and slather it with butter! There are many ways to enjoy this delicious homemade bread.
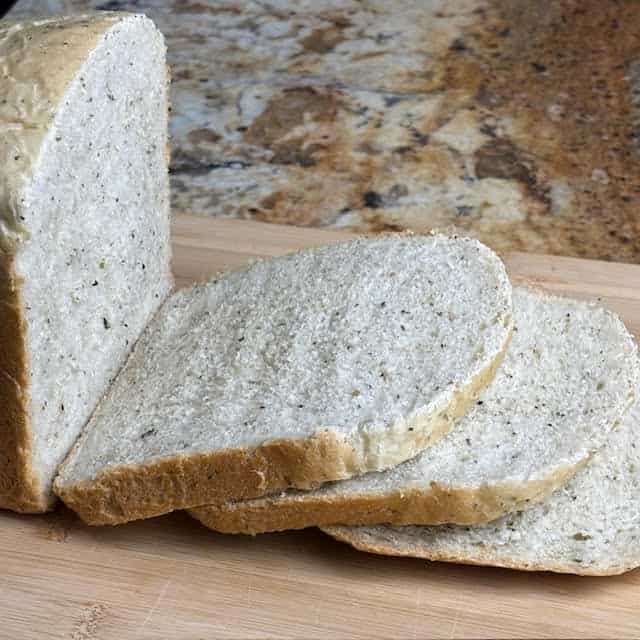
Bread Machine Italian Herb Bread (with Herb Topping)

Recipe Sections
| Recipe RatingFeatured Comment Miiko “Hands down, by far, one of the best if not the best bread recipes out there! Since I found this recipe, I make this bread every week. It is great for toast, it is great for panini’s, sandwiches, or to just eat a slice of bread. Your home will smell amazing while baking this bread. My whole family loves this bread!” |
Since this Italian herb bread recipe is done in a bread machine, it is simple & easy to make. It takes me about 5-10 minutes to prepare the ingredients and then the bread machine does most of the hard work (mixing, kneading & baking). For more great recipes, please visit Bread Dad’s main Bread Machine Recipes section. Bread Dad also has a printable and “pin-able” recipe at the bottom of the page.
Key Ingredient – Italian Herb Seasoning

FYI – For details on how to make the 1 lb version of this recipe, please visit my 1 lb Bread Machine Italian Herb Bread page.
Ingredients – Bread Machine – Italian Herb Bread – 1.5 lb Version
- 1 1/8 Cups – Milk (warm) – 259 milliliters
- 4 Tablespoons – Unsalted Butter (softened) – 57 grams – If you do not have butter or prefer not to use butter, you can replace the butter with olive oil.
- 3 Cups – Bread Flour (not all purpose flour) – 360 grams
- 1 1/2 Tablespoons – White Granulated Sugar – 19 grams
- 1 Tablespoon – Italian Herbs Seasoning – 6 grams
- 1/2 Teaspoon – Onion Powder (optional) – 2 grams
- 1 Teaspoon – Salt – 6 grams
- 1 Teaspoon – Bread Machine Yeast (or Instant Yeast) – 3.6 grams – Not active dry yeast
Ingredients – Bread Machine – Italian Herb Bread – 2 lb Version
- 1 1/2 Cups – Milk (warm) – 345 milliliters
- 6 Tablespoons – Unsalted Butter (sliced & softened) – 86 grams – If you do not have butter or prefer not to use butter, you can replace the butter with olive oil.
- 4 Cups – Bread Flour – 480 grams
- 2 Tablespoons – White Granulated Sugar – 25 grams
- 1 1/2 Tablespoons – Italian Herbs Seasoning – 9 grams
- 1 Teaspoon – Onion Powder (optional) – 4 grams
- 1 1/2 Teaspoons – Salt – 9 grams
- 1 1/2 Teaspoons – Bread Machine Yeast (or Instant Yeast) – 5.4 grams – Not active dry yeast
Servings – Roughly 12 slices
Equipment Needed – Measuring cup & spoons, flexible spatula, oven mitts, cooling rack… and of course, a bread machine.
If You Have A Small Machine, Try My 1 lb Bread Machine Italian Herb Bread
Optional – Sprinkle Italian Herbs on Top of Dough after Final Kneading

Instructions – Bread Machine – Italian Herb Bread
- Bread machine settings – 1.5 or 2 pound loaf, light color and “basic/white” bread setting
- Make sure the bread machine is unplugged and remove the bread pan from the bread machine.
- Pour the milk into the bread pan and then add the other ingredients (including the Italian herb seasoning). Place the bread machine yeast in last and the yeast should not touch the liquid or salt (until the bread machine is turned on and the ingredients start to be mixed together).
- Place the bread pan back in the bread machine and plug in the bread machine.
- Enter the correct settings into your bread machine (e.g. 1.5 or 2 lb, light color & basic/white bread setting) and press the “start” button.
- After the bread machine has finished baking the bread, unplug the bread machine. Remove the bread from the bread pan and place it on a wire cooling rack. Use oven mitts when removing the bread pan from the bread machine as it will be very hot!
- Let the bread cool on the cooling rack for 1 to 2 hours before cutting.
- Please read the tips section below for extra information on how to make this recipe successfully & how to avoid common bread machine problems.
If you liked this recipe, please leave a comment & 5 star rating below. Jump to comment section
📌 Save this recipe – Bookmark or pin it
| ❤️Love bread machine recipes? Then subscribe to my Bread Dad newsletter |
You Can Use This Bread To Make A “Herby” Oven Baked Grilled Cheese

Tips – Bread Machine – Italian Herb Bread
- The tips below are designed to help bread machine “novices” and those who haven’t touched their bread machine in years.
- Click on this “print recipe” link if you want to print out this recipe. It includes all of the recipe’s ingredients and instructions. However, the recipe print function does not include my tips section. Please read the tips section in order to avoid common recipe problems.
- This recipe is part of Bread Dad’s series on easy Bread Machine Recipes such as banana bread, multigrain bread, extra soft white bread, bagels and French bread.
- If you want to make a classic oval-shaped Italian bread (and not the usual bread machine “block” shaped bread), you should visit the page for our delicious Bread Machine Italian Bread recipe. It is a slightly more advanced recipe where the dough is made in a bread machine but baked in an oven.
- Optional – I like adding onion powder to this recipe in order to add extra flavor to the bread. However, this is purely optional and you can omit the onion powder if your family wouldn’t like a very mild onion flavor in their bread.
- Optional – For a more “authentic” herb bread appearance, I like to sprinkle an extra 1/2 teaspoon of Italian herb seasoning on top of the dough after the FINAL kneading cycle and before the baking cycle commences. I always wear oven mitts when opening the bread machine because it may be hot. Also people should not put their hands inside a bread machine for safety reasons. Read your bread machine manual in order to see how to do this step properly with your specific bread machine.
- Optional – If you are out of butter, you can use olive oil instead. My thanks to Rachel for this tip!
- Optional – If you have run out of Italian seasoning, you can replace it with dried rosemary. Thanks Betty for the tip!
- FYI – Use dried rosemary as the substitute (because you need 3 times as much if you use fresh rosemary). The moisture in fresh rosemary dilutes the flavor so you need a lot more to offset this dilution. In contrast, dried rosemary has a more concentrated flavor (as there is no moisture dilution).
- Visitors – What do you like to use Italian herb bread for? Sandwiches? Side dishes for mopping up spaghetti sauce? Other? Please post your Italian herb bread suggestions & ideas in the comment box below.
- Visitor variations & uses – Susan likes it “Sliced thin for sandwiches or toasted to dip in hummus. This bread makes amazing croutons and crumbs”, Gina turned this recipe into a gourmet pizza and “covered it with pizza sauce, pepperoni, Italian sausage, mushrooms and onions, then topped it with a 5 cheese shredded blend. Perfect!!”, Carissa likes to “make this bread to use in my stuffing mix for Thanksgiving and Christmas. I also like making croutons out of it, no extra seasonings needed. Kids love to make grilled cheese sandwiches with it”
- If you try to substitute garlic powder for the onion powder called for in this recipe, this recipe will not work as well. Garlic inhibits yeast growth and your bread will have trouble rising properly. Solution – Instead of using dehydrated garlic powder, you should mince & fry fresh garlic (as this will destroy the antimicrobial effect) before adding it to this bread.
- Italian seasoning is often made from the following herbs; basil, marjoram, oregano, rosemary, sage and thyme. You can find bottles of dried Italian herb seasoning in the supermarket. Or you can concoct your own mixture out of your favorite dried Italian herbs. If you want to learn more about Italian seasoning, you should read this Wikipedia page.
- If you are growing these herbs at home, you can make your own fresh Italian seasoning. This Italian herb bread will taste even better if you add your own home grown ingredients!
- If you like bread with great aromas, check out Bread Dad’s recipes for Bread Machine Onion Bread and Bread Machine Garlic Bread. Or my oven-baked recipes for Italian Herb & Cheese Bread, Onion Bread and Olive Oil Rosemary Bread.
- Some bakers like to make a little pocket on top of the flour (like a crater in the top of a flour volcano) in order to hold the yeast. This will prevent the yeast from falling into the milk & activating prematurely (until the bread machine starts).
- Do not place the salt on top of the yeast (as the salt can kill the yeast or limit the yeast’s growth) when adding the dry ingredients into the bread pan. You can use the yeast “pocket” method (see bullet point above) to keep the salt & yeast separate until the bread machine starts to mix the ingredients. Place the yeast in the pocket and place the salt away from the yeast on one of the sides of the bread pan.
- Use FRESH ingredients (e.g. flour & yeast) for the best results. Ingredients that have been sitting in the pantry for months can become stale or pick up weird smells & flavors.
- Try to keep your ingredients (e.g. flour) in airtight food containers in order to extend their shelf life. Airtight containers protect ingredients from moisture (in the air), pests, dust, etc.
- Flour (when not stored in an airtight container) can absorb a lot of moisture from the air. This extra moisture throws off recipes and can lead to bread collapses, etc.
- This recipe will NOT work with gluten free flour. Gluten free flour differs significantly versus flours with gluten and requires you to use recipes specifically designed for the use of gluten free flour. If you use gluten free flour in this recipe, you are likely to have a baking disaster.
- Do NOT use cold milk. The main problem with using regular milk is that people tend to use cold refrigerated milk and this can slow the yeast growth. Try to use warm milk (or instant powdered milk mixed into warm water). However, you should also be aware that the milk/water should not be too hot because very hot milk/water can kill the yeast.
- The ideal temperature for liquid ingredients used when making bread machine bread is around 100-110 F. Cold liquids (such as water & milk straight from the refrigerator) will slow yeast growth and liquid ingredients that are 140 F or above can kill the yeast. Some people like to use a digital bread thermometer in order to measure the temperature of their liquid ingredients.
- Bread machine yeast and instant yeast are very similar. Both can be used to make this recipe. However, active dry yeast is NOT the same as bread machine yeast or instant yeast. Active dry yeast must be pre-activated in liquid for 5-10 minutes before use. You do not have to pre-activate bread machine yeast or instant yeast. This recipe is not designed for the use of active dry yeast.
- If you haven’t used your bread machine in a long time, please buy some NEW bread machine yeast before making your bread. Old yeast can die or lose its potency and this will lead to bread that does not rise properly. Bread machine yeast may not be viable if it has been sitting in your pantry for years.
- If you liked this Italian style dish, you should also try my bread machine recipes for pizza dough (with Italian seasoning), whole wheat pizza dough, calzones, Italian bread, breadsticks, garlic bread, etc.
- If your bread comes out too dense, it is likely due to one of the following reasons; You are using old or stale yeast, using a cold refrigerator temperature liquid (which slows yeast growth), baking in a cold winter temperature kitchen (yeast likes kitchen temps of 75-80 degree F), using all purpose flour (versus bread flour as called for in the recipe), placing salt on top of or next to the yeast (salt kills yeast so it must be placed away from the yeast in the bread pan), etc.
- Kitchen humidity can impact a recipe. A winter kitchen tends to be drier due to your heating system drying out the air. In contrast, a kitchen in the summer can be much more humid. This change in humidity impacts baking as flour can soak up humidity from the air. Therefore, you might have to add 1-2 teaspoons of liquid in the winter if the dough is looking too dry. Or you might have to add 1-2 teaspoons of flour in the summer if the dough is looking too wet. If your kitchen is very dry or humid, you might have to add even a little more (but start with 1 teaspoon at a time until you achieve the right consistency). Of course, excessive kitchen humidity or dryness can impact a recipe at any time during the year (not just in the summer & winter)!
- Do NOT confuse or mix up the 1.5 lb & 2 lb ingredient amounts and machine settings when making this bread machine recipe (e.g. accidentally using some of the 2 lb ingredient amounts when making the 1.5 lb version). Cough, cough… I know because I have done this before!
- This recipe is NOT for 1 lb capacity bread machines. Please check the capacity of your bread machine before making this recipe. This recipe helps you to create 1.5 lb and 2 lb bread loaves.
- For bread machines with a loaf capacity greater than 1 lb, you should consider making the 1.5 lb version first. Some bread machines with a supposed 2lb loaf capacity are smaller than advertised. See how the 1.5 lb version works in your bread machine before attempting the 2 lb version.
- Having trouble with bread collapses & misshapen bread tops? Make sure to read Bread Dad’s article on bread machine bread collapses. It has reasons and solutions to potential bread collapses.
- For information on other possible errors, please visit my Common Bread Machine Mistakes page.
- If you have a problem with a bread machine recipe, please make sure that you are following the recipe exactly (e.g.. using right bread machine settings), using the correct amount of an ingredient (e.g. accidentally adding a teaspoon when a tablespoon is called for), using the correct ingredients (e.g. bread machine yeast versus regular yeast or bread flour versus all purpose flour), etc. Don’t “wing” things with recipes.
- If you start substituting ingredients (e.g. different types of flour), you are experimenting and should not expect similar results to the recipe shown above. You can expect some successes but more potential disappointments when you start to experiment with recipes.
- Be aware that some bread recipes may differ slightly between different types of bread machines. Therefore, please read your bread machine manufacturer’s instructions for basic bread recipes (e.g. white bread or whole wheat bread) as these are more likely to work on your individual bread machine.
- For more simple bread machine recipes, check out my page on Easy Bread Machine Recipes for Beginners.
- You can also use this homemade bread to make one of Bread Dad’s hot & toasty Grilled Cheese & Panini Sandwich Recipes such as air fryer grilled cheese and ham & cheese paninis.
- My recipes are based on US ingredient measurements (e.g. US cups & tablespoons). However, as a courtesy to our European visitors, I have also included some very ROUGH European equivalents (e.g. grams & milliliters). Since I rarely use European measurements when baking, please let me know in the comment section below if any of the European ingredient measurements need to be changed (e.g. for XYZ ingredient, milliliters are more commonly used versus the grams information listed in the recipe).
- Always wear oven mitts/gloves when dealing with a bread machine. The bread pan and the rest of the bread machine can get very hot during the baking process. This means that the bread pan and bread machine is likely to be very hot when you attempt to remove a baked good from the bread machine and/or bread pan.
- For more easy bread machine recipes (e.g.. white bread, whole wheat bread, banana bread, pizza dough & cornbread), please visit Bread Dad’s section on Bread Machine Recipes.
If you liked this recipe, please leave a comment below & give us a 5 star rating. Jump to comment section
| 📌Follow Bread Dad on Facebook for recipes & baking tips! |
Want More Recipes? Try These Next
- Bread Machine Recipes – 90+ recipes for banana bread, sourdough bread, pizza dough, cinnamon raisin bread, etc.
- Bread Recipes – French bread, buttermilk bread, bagels, Italian bread, etc.
- Banana Bread Recipes – 60+ recipes for banana nut bread, eggless banana bread, chocolate chip banana bread, etc.
- Quick Bread Recipes – Recipes using baking soda such as pumpkin bread, cranberry bread, etc.
| Made this recipe today? Snap a photo & show it off on my Facebook page! |
Reference Sources
- Wikipedia, Bread Machine
- Wikipedia, Italian Seasoning

Bread Machine – Italian Herb Bread
Ingredients
Ingredients – Bread Machine – Italian Herb Bread – 1.5 lb Version
- 1 1/8 Cups Milk (Warm)
- 4 Tablespoons Unsalted Butter (Sliced & softened)
- 3 Cups Bread Flour (Not all purpose flour)
- 1 1/2 Tablespoons White Granulated Sugar
- 1 Tablespoon Italian Herbs Seasoning
- 1/2 Teaspoon Onion Powder (Optional)
- 1 Teaspoon Salt
- 1 Teaspoon Bread Machine Yeast (Not active dry yeast)
Ingredients – Bread Machine – Italian Herb Bread – 2 lb Version
- 1 1/2 Cups Milk (Warm)
- 6 Tablespoons Unsalted Butter (Sliced & softened)
- 4 Cups Bread Flour (Not all purpose flour)
- 2 Tablespoons Sugar
- 1 1/2 Tablespoons Italian Herb Seasoning
- 1 Teaspoon Onion Powder (Optional)
- 1 1/2 Teaspoons Salt
- 1 1/2 Teaspoons Bread Machine Yeast (Not active dry yeast)
Instructions
- Bread Machine settings – 1.5 or 2 pound loaf, light color and “basic/white” bread setting
- Make sure the bread machine is unplugged and remove the bread pan from the bread machine.
- Pour the milk into the bread pan and then add the other ingredients (including the Italian herb seasoning). Place the bread machine yeast in last and the yeast should not touch the liquid or salt (until the bread machine is turned on and the ingredients start to be mixed together).
- Place the bread pan back in the bread machine and plug in the bread machine.
- Enter the correct settings into your bread machine (e.g. 1.5 or 2 lb, light color & basic/white bread setting) and press the "start" button.
- After the bread machine has finished baking the bread, unplug the bread machine. Remove the bread from the bread pan and place it on a cooling rack. Use oven mitts when removing the bread pan from the bread machine as it will be very hot!
- Let the bread cool on the cooling rack for 1 to 2 hours before cutting.
- Please read the recipe's tips section on Bread Dad (BreadDad.com) for extra information on how to make this recipe successfully & how to avoid common bread machine problems.
Notes
Nutrition
Related Recipes
- Bread Machine French Bread
- Bread Machine Multigrain Bread
- Bread Machine Oatmeal Bread
- Bread Machine Pizza Dough
- Bread Machine White Bread
- Bread Machine Whole Wheat Bread
Please leave a comment & recipe rating in the comment box below.